Want to migrate a WordPress site to a new host without breaking anything? Good news: it’s a lot less scary than it looks. Your site is just two things, a folder of files and a database. Copy both, point your domain at the new server, and you’re done. The trick is doing it in the right order so visitors never notice.
This guide walks you through the whole move: what to prepare, three ways to copy the site (from “let the host do it” to fully manual), how to test before anyone sees it, how to switch DNS with no downtime, and how to fix the errors people usually hit.
Quick answer
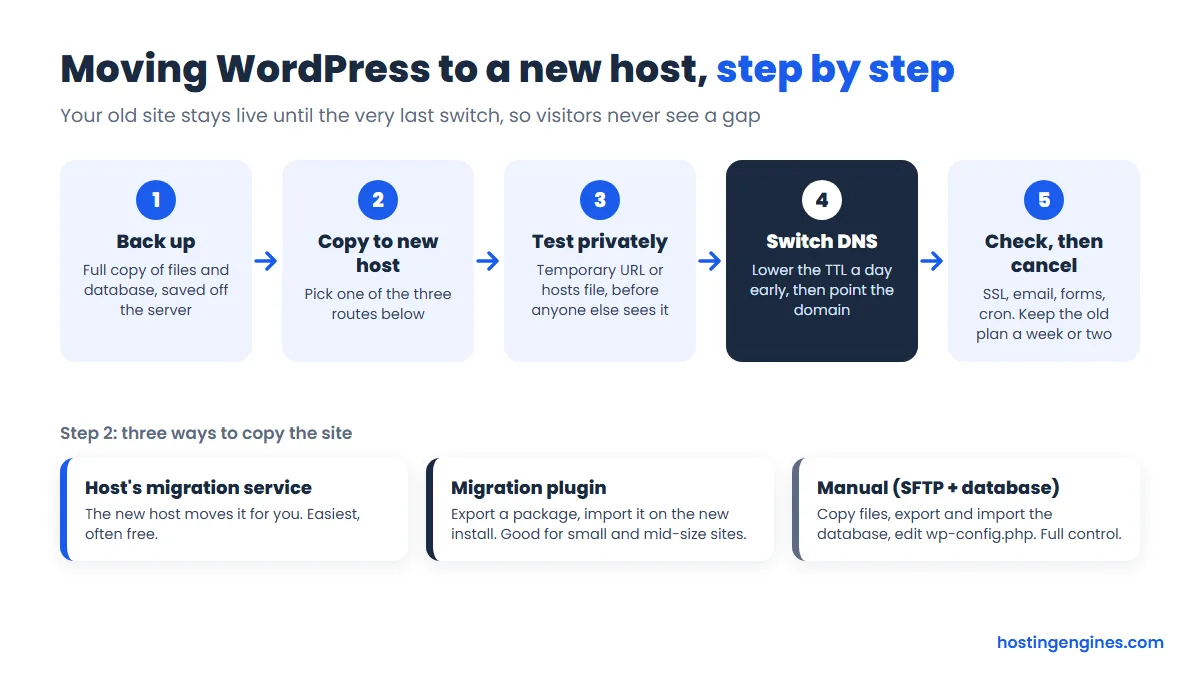
- Take a full backup (files and database) and keep a copy off the server.
- Lower your domain’s DNS TTL to 300 seconds a day or two before the move.
- Copy the site to the new host: ask the host’s free migration team, use a plugin such as Duplicator or All-in-One WP Migration, or move files and the database by hand.
- Test the new copy privately with your hosts file or a temporary URL.
- Point your domain to the new server, then check SSL, email, forms and caching.
- Keep the old hosting plan running for a week or two before you cancel it.
Still deciding whether you need to move at all? Our guide on when it’s time to leave shared hosting covers the warning signs, and how to choose a web hosting provider helps you pick the new home before you start packing.
Before you start: 5 things to do first
Most failed migrations go wrong before anyone copies a single file. Ten minutes of prep saves hours of panic later.
1. Make a full backup you can actually restore
Back up everything: the whole WordPress folder (wp-content matters most, since it holds your themes, plugins and uploads) plus a database export. Download it to your computer or cloud storage. A backup that only lives on the server you’re leaving isn’t much of a safety net.
2. Check PHP and WordPress versions on both hosts
Update WordPress, your theme and your plugins on the old host first, so you move a clean, current site. Then compare PHP versions. WordPress.org recommends PHP 8.3 or newer and MySQL 8.0 or MariaDB 10.11 or newer. If your old server runs an ancient PHP version and the new one runs something modern, an outdated plugin can break the moment it lands. Better to find that out now than after the DNS switch.
3. Lower your DNS TTL a day or two ahead
TTL (time to live) tells DNS resolvers how long to remember your domain’s IP address. If it’s set to a day, some visitors could keep landing on the old server for a day after you switch. Drop the TTL on your A record to 300 seconds (5 minutes) at least 24 to 48 hours before moving, so the change spreads quickly when the time comes.
4. Write down what lives outside WordPress
Email accounts, cron jobs set in the control panel, subdomains, redirects in .htaccess, custom DNS records (SPF, DKIM, verification records for Google or Microsoft). A WordPress migration plugin won’t move any of these. Make a list now so nothing gets lost.
5. Pick a quiet time and freeze changes
Choose your lowest-traffic hours. From the moment you copy the database until DNS has switched, avoid publishing posts, and if you run a shop, consider pausing orders. Anything written to the old database after the copy won’t exist on the new one.
How to migrate a WordPress site: 3 methods
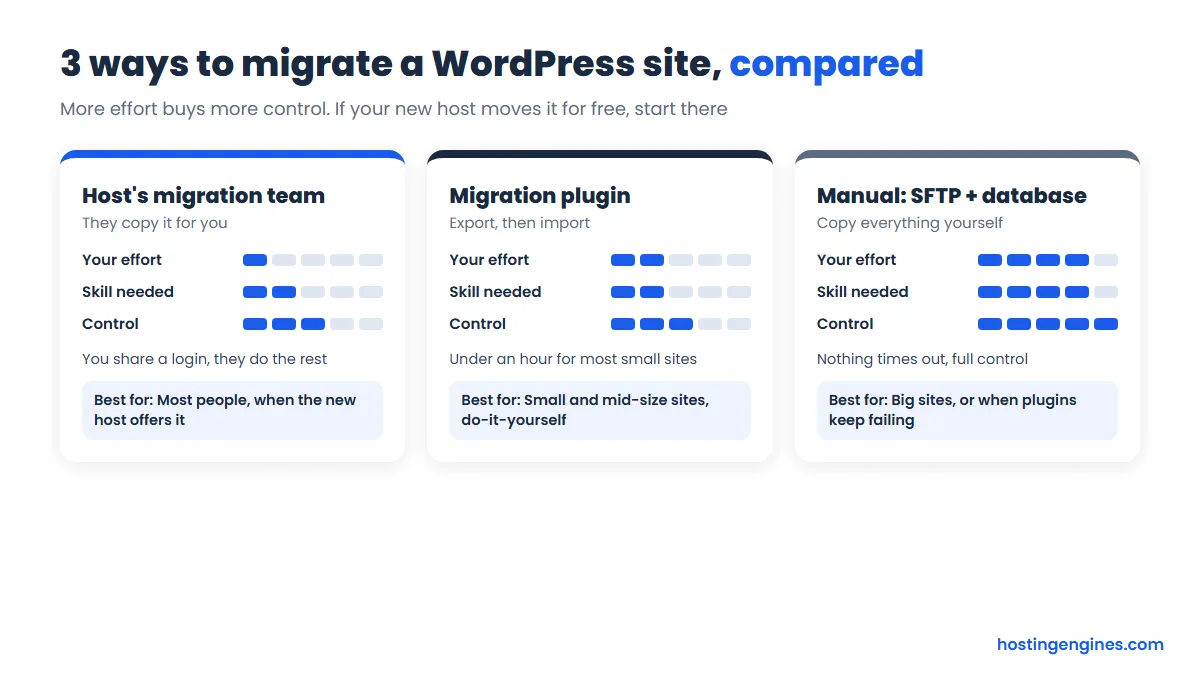
Which one should you use? If your new host offers free migration, take it. Seriously, it’s the least work and their team has done it thousands of times. If not, a plugin handles most small and medium sites in under an hour. Go manual when the site is large, plugins keep timing out, or you just want full control.
Method 1: Let your new host migrate it for free
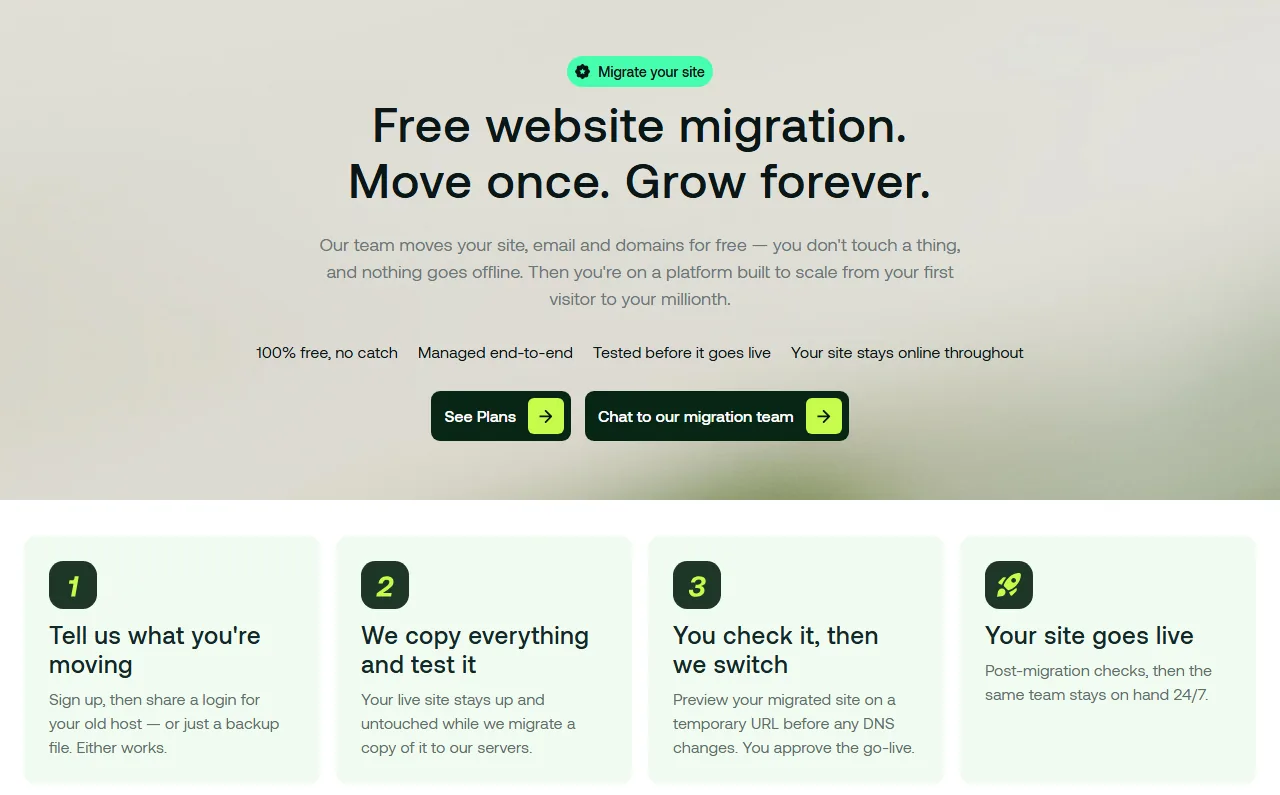
Many hosts move your site for you because it removes the biggest reason people don’t switch. You usually fill in a form or open a ticket, share your old host’s login (or a backup file), and wait. Here’s what the main hosts we checked offer right now. Offers checked in 2026; they change, so confirm on the host’s page before you buy.
| Host | What’s free | Worth knowing |
|---|---|---|
| Hostinger | Migration by their team, as many sites as your plan allows | One request per site. Simple WordPress moves typically take under two hours. Website builder sites (Wix, Squarespace, Shopify) can’t be moved. |
| Hosting.com (formerly A2 Hosting) | Unlimited migrations on every plan, done by their team | Most finish in 30 minutes to 48 hours. They say mailboxes come across too. |
| InMotion Hosting | Site migration included with every shared plan | Their team handles it and tests through a hosts file before the DNS cutover. |
| ScalaHosting | Free, unlimited migrations on shared, reseller and managed VPS plans | Done by technicians on request through a ticket or live chat. |
| Cloudways | First site moved by their experts, plus unlimited self-serve moves with their WordPress Migrator plugin | Expert migrations usually take 1 to 2 business days. Extra expert moves aren’t free. |
| DreamHost | Free Automated Migration plugin. DreamPress plans include one professional migration per site. | Professional migration on other plans is a paid service. The plugin doesn’t move email. |
Not every big name is on this list. Some hosts only include a free team migration with certain plans or charge a per-site fee for assisted moves, so read the fine print. Moving to Cloudways specifically? We have a full walkthrough on migrating WordPress to Cloudways step by step.
A few tips that make a host migration go smoother:
- Create a temporary admin account for the migration team instead of sharing your own password, and delete it afterwards.
- Ask whether they move email, or only the website. The answer varies a lot.
- Ask them to tell you before they change DNS, or to leave the DNS switch to you.
Method 2: Use a migration plugin
Plugins pack your site into one file (or stream it directly) and unpack it on a fresh WordPress install at the new host. They handle the database URL changes for you, which is the fiddliest part of a manual move. Here are the popular ones and their real limits as listed on WordPress.org today:
| Plugin | Free version | Main limit |
|---|---|---|
| Duplicator | Builds a package (archive + installer.php) you run on the new server | Free version doesn’t support multisite. Scheduled backups and cloud storage are Pro features. |
| All-in-One WP Migration | Export to one .wpress file, import it on the new site | Your host’s upload limit decides how big a file you can import. The paid Unlimited Extension gets around it. Multisite needs a paid extension. |
| Migrate Guru | Copies the site server to server, no file download needed | Sites up to 200 GB, and 5 site migrations per user per month. Runs the heavy lifting on its own servers. |
| UpdraftPlus | Backup plugin; you can restore a backup on the new site | Handy if you already use it for backups. |
Our pick for most people: Migrate Guru for bigger sites, since you never download or upload a huge file, and All-in-One WP Migration for small ones because it’s the simplest to understand. Duplicator is the one developers tend to like, as the installer gives you more control.
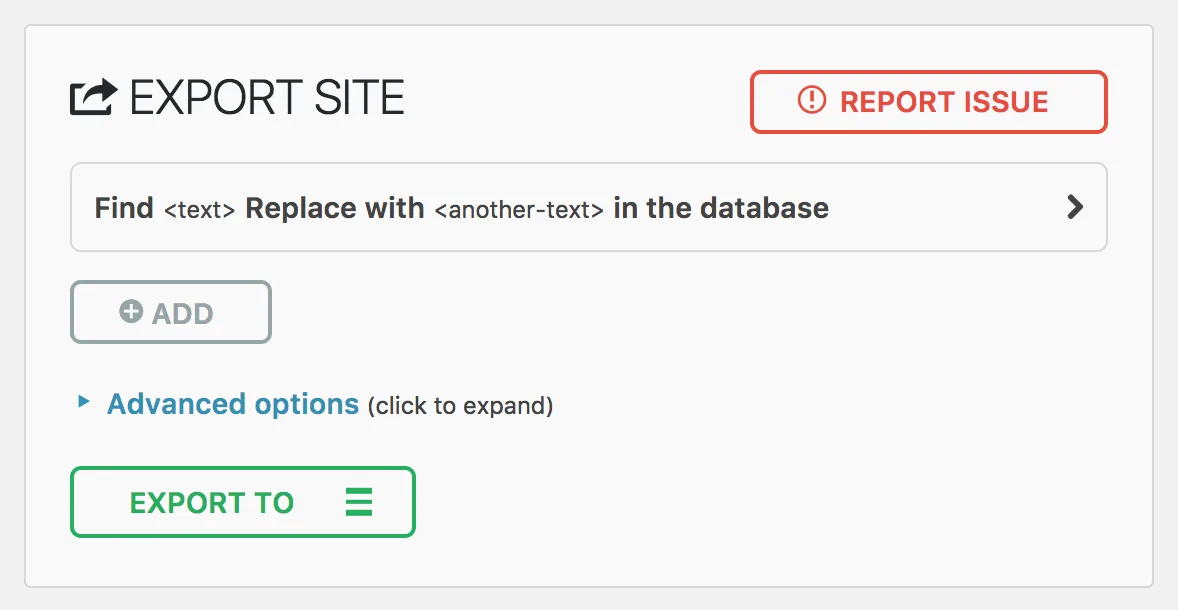
The general plugin process looks like this:
- Install WordPress on the new host (most hosts do it in one click). Use the temporary URL they give you.
- Install the same migration plugin on both the old and the new site.
- Export on the old site (or, with Migrate Guru, enter the new server’s details).
- Import on the new site. It overwrites the fresh install, so your old admin login works afterwards.
- Log in, go to Settings > Permalinks and click Save once to rebuild the rewrite rules.
Method 3: Migrate WordPress manually (SFTP + database)
The manual way takes longer but nothing can time out on you, and you understand exactly what moved. You’ll need SFTP access (FileZilla works fine), phpMyAdmin or SSH on both hosts.
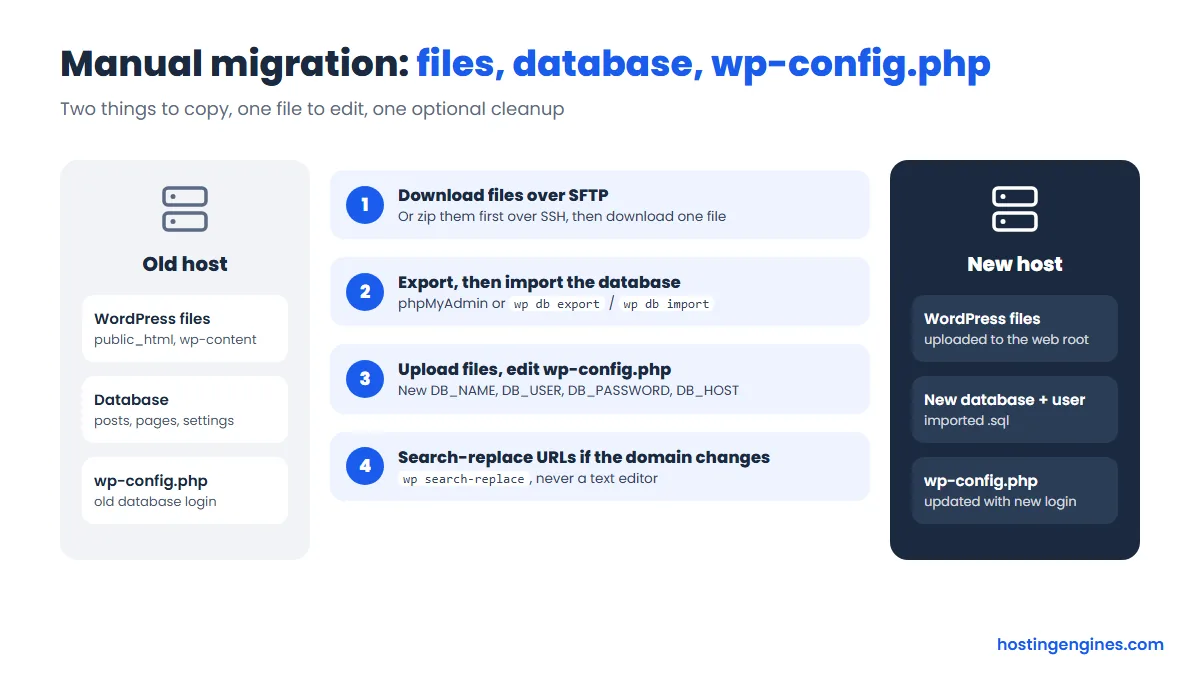
Step 1: Download your files
Connect to the old server over SFTP and download the whole WordPress folder (often public_html). If you have SSH, it’s much faster to zip it on the server first, for example zip -r site.zip public_html, and download one file.
Step 2: Export the database
In phpMyAdmin, select your WordPress database and use Export (Quick, SQL format). With SSH, wp db export site.sql (WP-CLI) or mysqldump does the same. Not sure which database is yours? Open wp-config.php and look for DB_NAME.
Step 3: Create a database on the new host and import
In the new host’s control panel, create a database and a user with all privileges on it. Write down the name, user and password. Then import your .sql file through phpMyAdmin (or wp db import site.sql). Very large databases can hit phpMyAdmin’s upload limit; SSH import avoids that.
Step 4: Upload files and edit wp-config.php
Upload the files to the new server’s web root. Then open wp-config.php and update these four lines to match the new database:
DB_NAME: the new database nameDB_USERandDB_PASSWORD: the new database userDB_HOST: usuallylocalhost, but some hosts use a separate hostname (check their docs)
Also check the table prefix ($table_prefix) matches the tables you imported. If the old site used wp7x_ and the file says wp_, WordPress will think it’s a brand new install.
Step 5: Search and replace URLs (only if the domain changes)
Keeping the same domain? Skip this step. If the address changes (say, from a temporary URL or a new domain), you need to update the old URL everywhere in the database. Don’t do it with a text editor on the .sql file: WordPress stores some settings as serialized data, and a plain find and replace breaks them. Use a serialization-safe tool instead, like WP-CLI or the Better Search Replace plugin:
wp search-replace 'https://old-domain.com' 'https://new-domain.com' --skip-columns=guid
The --skip-columns=guid part follows the official WordPress migration docs: the GUID column shouldn’t be changed. Add --dry-run first if you want to see what would change.
Moving to an unmanaged cloud server instead of regular hosting? The manual route is basically what we do in our guide to migrating WordPress to a Vultr server, plus setting up the web server itself.
Test the new site before you switch DNS
Here’s the step people skip, and regret. Your domain still points at the old host, so how do you see the new copy? Two ways:
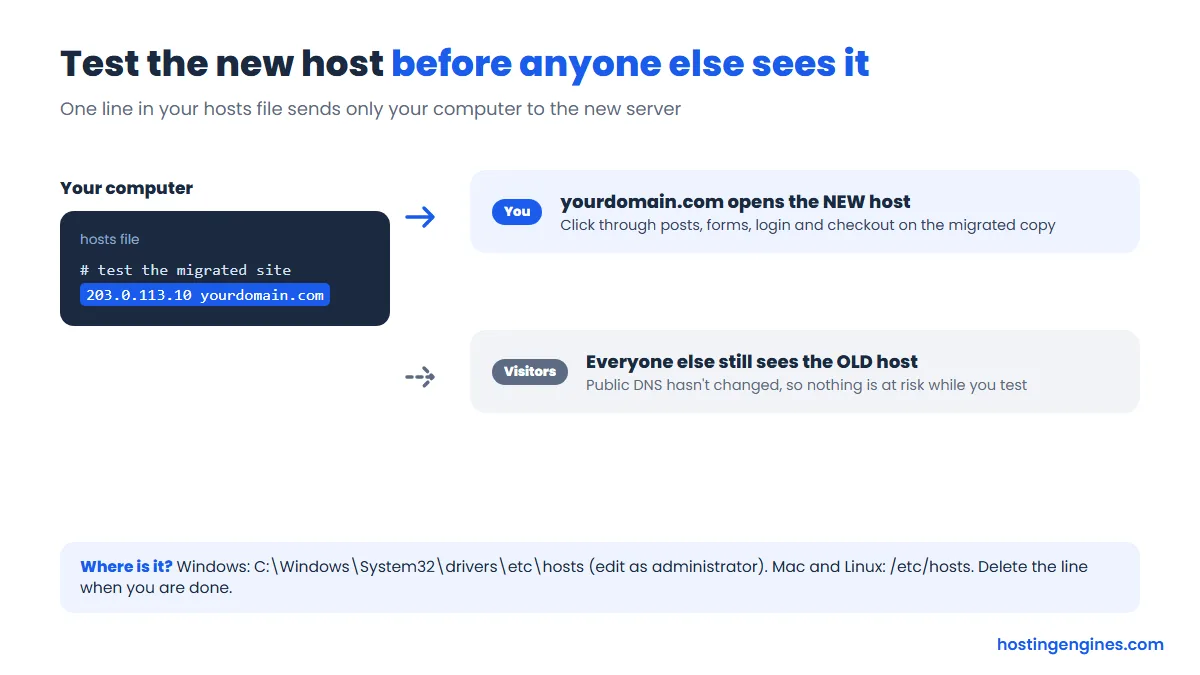
- Edit your hosts file. This makes only your computer load the domain from the new server. Add a line like
203.0.113.10 yourdomain.com www.yourdomain.com(use the new server’s IP). On Windows the file is C:\Windows\System32\drivers\etc\hosts (open Notepad as administrator); on Mac and Linux it’s /etc/hosts. Remove the line when you’re done. - Use the host’s temporary URL or preview link. Many hosts give you one. It’s quick, but a site that still has the real domain in its database may redirect you back to the live site, so the hosts file trick is often more reliable.
Then click around like a visitor: home page, a few posts, images, menus, the contact form, search, login, and checkout if you sell anything. If it all works here, it’ll work after the switch.
Switch DNS with no downtime
When the new site checks out, point your domain at it. You have two options:
| Change the A record | Change the nameservers | |
|---|---|---|
| What changes | DNS stays where it is, only the IP changes | The new host runs all your DNS |
| Speed | Fast with a low TTL: minutes to a few hours | Can take up to 48 hours to spread |
| Email and other records | Email (MX), SPF and other records stay untouched | Copy MX, TXT and CNAME records first or email breaks |
| Rolling back | Easy: put the old IP back | Harder to undo quickly |
| Where DNS lives afterward | Still at the old provider | Everything managed in one place |
Both work. The A record is the gentler switch for most moves.
- Change the A record (and AAAA if you use IPv6) to the new server’s IP. Your DNS stays where it is, and with the TTL already at 300 seconds most visitors move over within minutes to a few hours. This is the gentler option, and it keeps your email records untouched.
- Change the nameservers to the new host’s. Simpler if you want everything managed in one place, but nameserver changes can take up to 48 hours to spread, and you must copy every other DNS record (MX, TXT, CNAME) to the new host first or email will break.
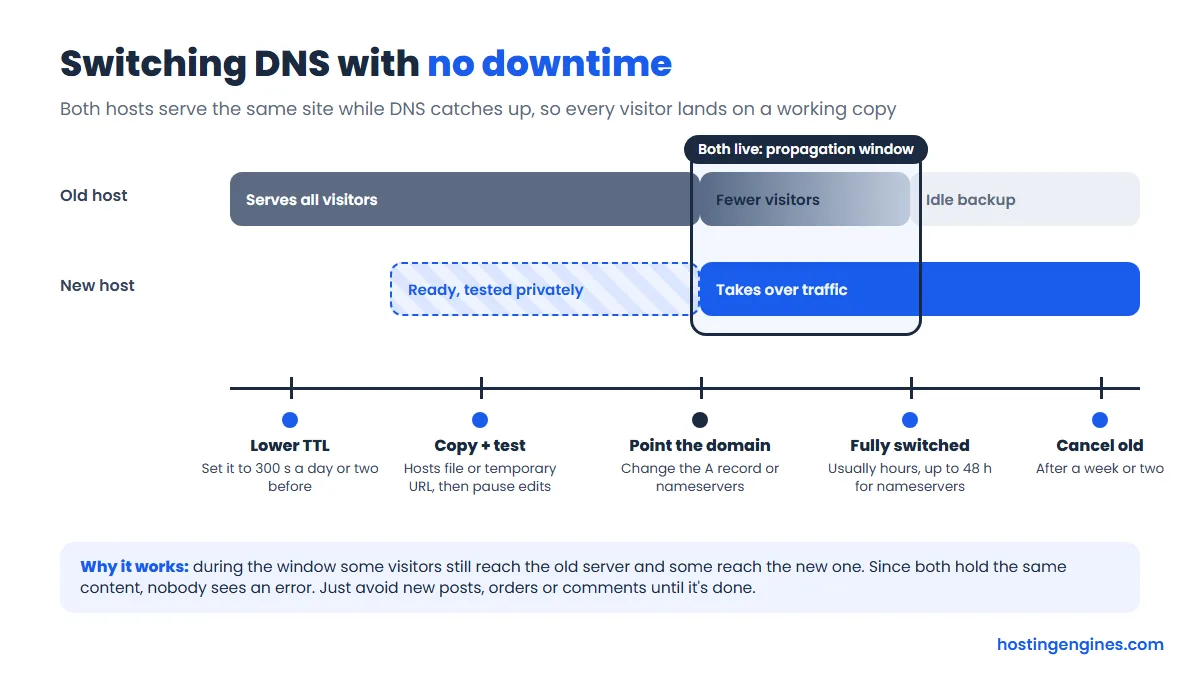
The reason this causes no downtime: both servers have a working copy of your site. While DNS updates around the world, some visitors reach the old one and some the new one, and either way they see your site. That’s also why you don’t cancel the old plan the same day.
After the move: your checklist
- SSL certificate: issue a free Let’s Encrypt (or the host’s own) certificate once DNS points to the new server, then confirm https works with no browser warning.
- Permalinks: if posts return 404, go to Settings > Permalinks and click Save. That rewrites .htaccess on Apache and LiteSpeed servers.
- Email: send and receive a test message. Check MX, SPF and DKIM records, and test your contact form (an SMTP plugin is often needed on a new host).
- Caching: clear every cache layer. If the old host had its own cache plugin (some hosts install one), remove it and use the one that matches your new server, for example LiteSpeed Cache on LiteSpeed hosts.
- Cron jobs: recreate any server cron jobs from your list. If you used a real cron to replace WP-Cron, set it up again.
- CDN: if you use Cloudflare or another CDN, update the origin IP there (with Cloudflare, that’s the A record in its dashboard) and purge the CDN cache.
- Backups and security: switch on backups at the new host and re-check any security plugin or firewall settings.
- Search Console: nothing changes for Google if the domain stays the same, but look at the coverage report over the next week for new errors.
Keep the old account for at least a week or two. If something turns out to be missing, you can still grab it. Once you’re sure, download a final backup and cancel.
Common migration errors and how to fix them
“Error establishing a database connection”
WordPress can’t log in to the database. Nine times out of ten, one of the four values in wp-config.php is wrong. Re-check DB_NAME, DB_USER, DB_PASSWORD and DB_HOST against what you created, and make sure the user was actually added to the database with all privileges. Some hosts prefix names with your account name (like u123_wpdb), so copy them exactly.
White screen (blank page)
Usually a PHP fatal error, often a plugin or theme that doesn’t like the new PHP version. Add define('WP_DEBUG', true); and define('WP_DEBUG_LOG', true); to wp-config.php and read wp-content/debug.log. To rule out plugins fast, rename the wp-content/plugins folder over SFTP; if the site loads, rename it back and disable plugins one by one. Turn debugging off when you’re done.
Mixed content warnings (no padlock)
Some images or scripts still load over http. Make sure both URLs in Settings > General use https, then run a search-replace from http://yourdomain.com to https://yourdomain.com with WP-CLI or Better Search Replace. Hard-coded http links in your theme or a page builder’s CSS may need a manual fix.
500 Internal Server Error
Most often a .htaccess rule the new server doesn’t accept (old host-specific PHP handlers are a classic). Rename .htaccess to .htaccess-old, then go to Settings > Permalinks and save to create a clean one. If that’s not it, check file permissions (folders 755, files 644) and the server error log in your control panel, and look at the PHP memory limit.
Redirect loop or you land back on the old site
Your computer or network may still cache the old DNS answer, or your hosts file still has a test line. Remove it, flush DNS (ipconfig /flushdns on Windows) and try a private window. If you use Cloudflare, an SSL mode of “Flexible” with https forced on the server can also loop; “Full (strict)” usually fixes it.
FAQ
How long does it take to migrate a WordPress site?
For a typical small site, the copy itself takes under an hour with a plugin. Host migration teams quote anything from under two hours to a couple of business days, and DNS can take a few minutes to 48 hours to fully switch. Plan for a day from start to finish and you won’t feel rushed.
Will migrating my WordPress site hurt SEO?
No, not if the domain and URLs stay the same and the site never goes down. Google just sees the same pages on a different server. Problems come from downtime, broken permalinks or a domain change without 301 redirects, all of which this guide helps you avoid.
Can I migrate WordPress for free?
Yes. Many hosts migrate your site for free when you sign up, and free plugins like Duplicator, All-in-One WP Migration and Migrate Guru handle most sites. Paid add-ons only matter for very large sites, multisite networks or extras like scheduled backups.
Do I need to move my domain to the new host?
No. Your domain registration can stay where it is; you only change its DNS (A record or nameservers) to point at the new server. Transferring the domain is a separate, optional job, and it’s best done after the site move is finished.
Will my email move with my website?
Not automatically. Migration plugins only copy WordPress. If your email is hosted with your old web host, you need to recreate the mailboxes on the new host (some migration teams copy them for you) and update MX records. If you use Google Workspace or Microsoft 365, just keep those DNS records as they are.
When can I cancel my old hosting?
Wait at least a week or two after the DNS switch. That covers slow DNS caches, gives you time to spot anything missing, and lets you grab a final backup. Check your old host’s refund and renewal dates so you don’t pay for another term by accident.