You deployed a server and created a website on Linode and now you want to know how to install a free SSL certificate on your website. It’s an easy task, and today you will learn exactly how you can do it step by step.
Linode is a cloud computing service that provides reliable cloud hosting solutions. It provides many products including Linodes (cloud VPS) environment.
By the end of this step-by-step tutorial, you will be able to install the Let’s Encrypt free SSL certificate on any website that you host on Linode VPS.
Read how to install a VPS server and WordPress on Linode.
What is an SSL Certificate?
SSL stands for Secure Sockets Layer, it’s a digital certificate that authenticates a website’s identity and enables an encrypted connection.
An SSL certificate is a bit of code on your web server that provides security for online communications. When a web browser contacts your secured website, the SSL certificate enables an encrypted connection.
SSL keeps internet connections secure and prevents criminals from reading or modifying information.
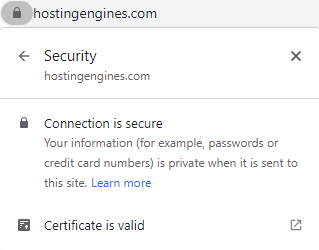
The SSL certificate helps customers gain confidence so they can enter personal information such as emails and credit cards. Also, to view confidential information such as health benefits or financial accounts.
1\ Point Domain to Linode
Before you can install the free SSL certificate on a Linode server, there are a few things has to be done. If you don’t have a domain name yet, register a domain name from any domain name registrar such as NameCheap.
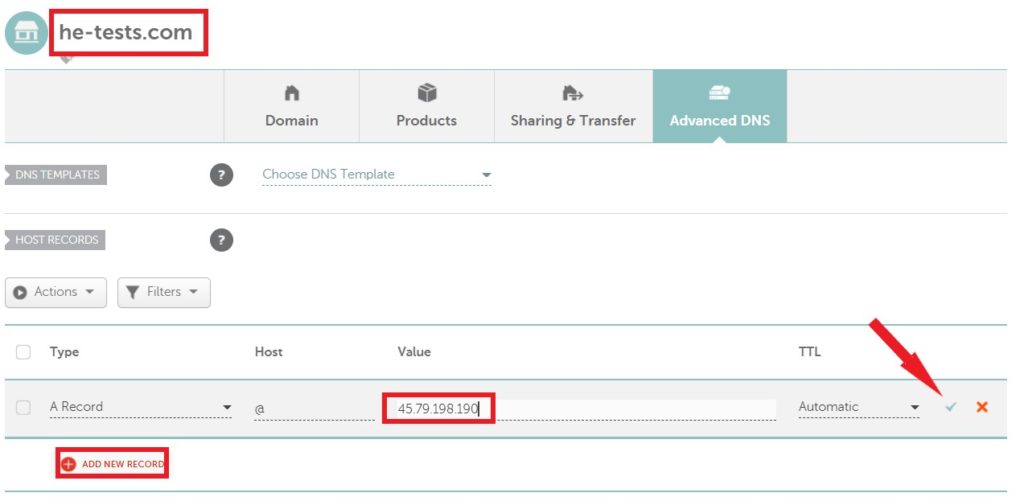
To point your domain name you need to add an “A” record to the DNS settings of that domain name. The “A” record maps a domain name to the IP address. So whenever someone clicks on your domain name, he will be directed to your website.
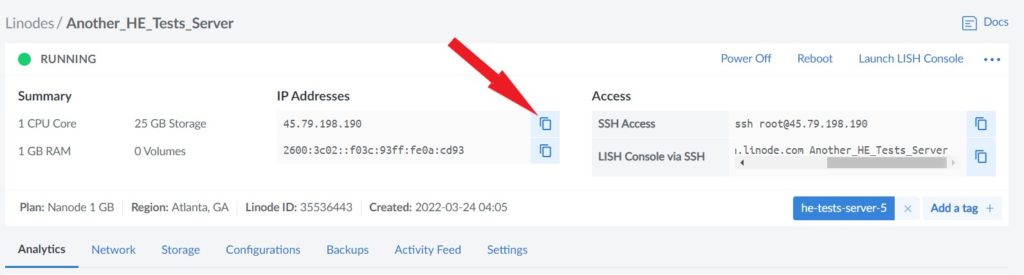
First copy the IP address of your server, you can find all your servers on the Linodes tab on the main left sidebar control panel. Click on the copy icon beside the IP address to copy your IP address.
Next, go to the DNS settings of your domain name on your domain name registrar. Click add a record, and select “A“ record.
In the Host field, add the “@” sign. This represents the origin domain.
Next, paste the IP address of the server you copied earlier into the value field. If you lost it go back and copy it again.
It may take some time for the new DNS record to take action. Enter your domain name and see if it’s pointing to the new IP address you added.
2\ Add Domain to Server and Application
If you followed our tutorial on how you can install WordPress on Linode, you won’t need this step, as you probably added your domain name while you are deploying the server.
Adding your domain name while you are creating the server will save you the trouble of adding your domain name on the server and on the WordPress admin panel.
If you didn’t include your domain name while installing the server on Linode, follow the steps below to know how to add your domain name manually.
However, this is not required for the SSL certificate installation, but it’s better to configure it so your website can run smoothly. Here’s what to do.
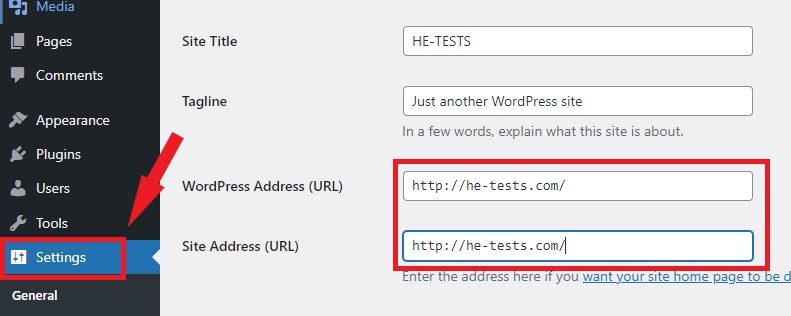
First login to your WordPress admin panel, and use your emails or your IP address if your domain name is not totally propagated. (yourdomain.com/wp-admin) or (your IP/wp-admin).
Next, hover over Settings and select General. Replace the IP address in the WordPress Address (URL) and the Site Address (URL) with your domain name and then click Save Changes.
That’s it. Now you shouldn’t face any frontend problems for your website.
Since this article is more pointed at non-developers WordPress users we will cover how to install the free SSL certificate on Linode on Debian and Ubuntu images.
If you didn’t remember what type of Image you have chosen when you first launched the server, go to your server dashboard to find out.
3\ Install SSL certificate with Apache
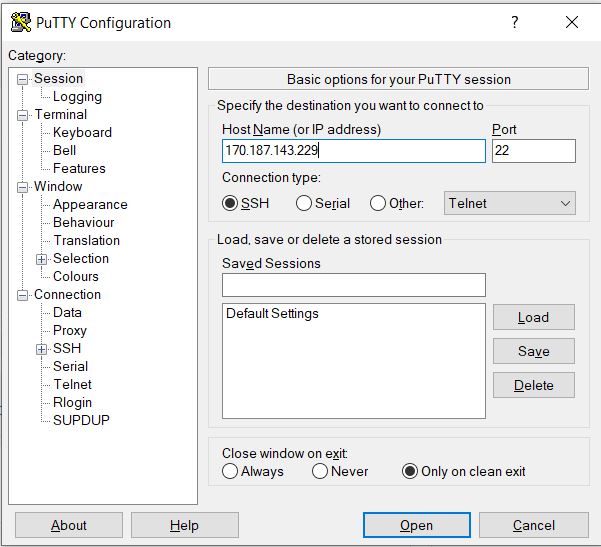
The first step you should approach to install an SSL certificate on the Linode server is to login to your server root via SSH terminal. Use the Linode console or Putty to log into your server.
First, enter your IP address then hit enter, then click accept. Next, Enter your server username “root” and password and hop up to the next step.
1. Install Snapd:
Since certbot is packaged as a snap, and we want to install certbot in order to install the SSL certificate, we’ll need to install snapd before installing certbot
- To install the Snapd enter the following lines into the SSH terminal:
sudo snap install core
sudo snap refresh core
When you enter the second line, you will be asked if you want to continue, enter (Y) for yes, and hit enter to install snapd.
- Install the core snap. enter each command at a time
sudo snap install core
sudo snap refresh core
2. Install Certbot:
The next step is to install Certbot using the snap command.
- Remove any previously installed certbot packages to avoid conflicts with the new Snap package. If you didn’t install any certbot, skip this verse.
sudo apt remove certbot- Use Snap to install Certbot.
sudo snap install --classic certbot- Configure a symbolic link to the Certbot directory using the
lncommand.
sudo ln -s /snap/bin/certbot /usr/bin/certbot3. Request an SSL Certificate Using Certbot:
When Certbot runs, it requests and installs the certificate file along with a private key file.
Certbot also automatically edits the configuration files for Apache, which dramatically simplifies configuring HTTPS for your web server.
- Request a certificate and automatically configure it on Apache
sudo certbot --apache3. Complete the SSL Certificate Installation:
Once you do all the verses above, your SSL certificate should start installing automatically.
During the installation process, Certbot will prompt you for some basic information including your email address and domain name.
- Enter email address: The first prompt is to request an email address where Certbot can send urgent notices about the domain or registration. enter your domain name and press enter.
- Accept terms of service. Certbot next asks you to agree to the Let’s Encrypt terms of service. If you agree with the terms, enter
"Y” for yes. Entering “N"terminates the certificate request.
- Optionally subscribe to mailing list. Certbot asks if you want to subscribe to the EFF mailing list. You can answer either
YorNwithout affecting the rest of the installation.
- Enter the domain name. Certbot now requests a domain name for the certificate. Since we only have one domain on this server, it showed me the only domain I have. enter 1 and hit enter.
When you go through all the settings above, the SSL certificate should be installed successfully and your website should be encrypted.
4\ Install SSL certificate with Nginx
Installing the SSL certificate on Nginx is similar to Apache, the only difference is in the step when you request the SSL certificate using certbot.
After you access the server via SSH terminal as we show you earlier, install snapd in the server.
1. Install Snapd:
Since certbot is packaged as a snap, and we want to install certbot in order to install the SSL certificate, you will have to install snapd before installing certbot.
To install the Snapd enter the following lines one by one into the SSH terminal:
sudo snap install core
sudo snap refresh core
2. Install Certbot:
The next step is to install Certbot using the snap command.
- Remove any previously installed certbot packages to avoid conflicts with the new Snap package. If you didn’t install any certbot, skip this verse.
sudo apt remove certbot- Use Snap to install Certbot.
sudo snap install --classic certbot- Configure a symbolic link to the Certbot directory using the
lncommand.
sudo ln -s /snap/bin/certbot /usr/bin/certbot3. Request an SSL Certificate Using Certbot:
For the third step: Request an SSL Certificate Using Certbot.
When Certbot runs, it requests and installs the certificate file along with a private key file. Request a certificate and automatically configure it on Nginx enter the line below and hit enter:
sudo certbot --nginx4. Complete the SSL Certificate Installation:
Once you do all the verses above, your SSL certificate should start installing automatically.
During the installation process, Certbot will prompt you for some basic information including your email address and domain name.
- Enter email address: The first prompt is to request an email address where Certbot can send urgent notices about the domain or registration. enter your domain name and press enter.
- Accept terms of service. Certbot next asks you to agree to the Let’s Encrypt terms of service. If you agree with the terms, enter
"Y” for yes. Entering “N"terminates the certificate request.
- Optionally subscribe to the mailing list. Certbot asks if you want to subscribe to the EFF mailing list. You can answer either
YorNwithout affecting the rest of the installation.
- Enter the domain name. Certbot now requests a domain name for the certificate. Since we only have one domain on this server, it showed me the only domain I have. enter 1 and hit enter.
By now, the free SSL certificate should be installed successfully on your website. This is all you need to do to install a free SSL certificate on Linode. Wait a few minutes to let it propagate with your domain name and serve.
Read Also:
Install WordPress on Linode.
Install WordPress on Vultr.