Hosting your PHP script -whether a SaaS business or free software- requires robust hosting with better-dedicated resources than shared hosting.
You may have hosted your PHP script on shared hosting or you just wanna start big for a small price and want to host your PHP script on a cloud VPS server such as Vultr. If that’s the case, then you are in the right article.
By the end of this informative detailed tutorial, you will be able to host and install your PHP script on Vultr, whether it’s your own PHP script or you bought it from CodeCanyon. So, what is PHP?
What is PHP?
PHP is an open-source server-side programming and scripting language that can be used in web development such as websites and applications. It is widely used on the internet and it has been a popular choice for many web developers.
The reason why PHP has become so popular is that it’s easy to learn and use, which makes it a perfect language for beginners who are just starting out with coding or for anyone who wants to get into web development.
Also, PHP is extremely powerful and flexible, making it a perfect fit for developing any website or application.
What is Vultr?
Vultr is a cloud-based hosting service provider that provides an easy way to get started with your own website or application. They provide an intuitive control panel that allows you to easily manage your server settings.

Vultr provides servers in 25 data centers in various locations around the world. Also, it provides reliable and affordable cloud hosting services to individuals and businesses worldwide starting at $5 per month per 1 GB VPS server.
Why you should use a VPS server for your PHP web hosting?
With VPS, users can have their own virtual private server that they can use to run websites and applications. In this sense, VPS is better than shared hosting. But why specifically?
VPS provides a lot of benefits to users including the following:
- Increases the performance of your website by providing a dedicated server with dedicated resources and fast connections.
- Cost-effective and has less downtime because they require less hardware and maintenance costs.
- Provides you with more control over your server so you can make adjustments as needed without having to worry about affecting other websites or applications.
- Provides an easier way to scale up your website or application as you can add more resources when needed.
- A great choice for businesses that need to host multiple websites or run web applications with different needs.
- Can be used for websites, databases, application servers, and other software applications.
Why is Vultr might be your best choice?
There are many reasons you may like to host and install your PHP application Vultr instead of other web-hosting providers, we can summarize that into these below reasons:
- Vultr is a cloud computing service: which means you get a server on the cloud, that makes servers cheap, reliable, more secure, and offers great performance.
- Reliable service and great performance: Since the server and the data center are located in a remote location, it offers better performance as well as more reliability as compared to traditional hosting.
- User-friendly and dynamic interface: The dashboard that they provide is just easy to navigate and fast to work with. They provide a user-friendly and dynamic interface.
- Reasonable price: The Vultr pricing starts at $5 per month, and you get a cloud VPS server with dedicated resources of 1 GB ram, 1 CPU processor, 25 GB storage space, and 1 TB bandwidth.
- Pay as you go: This means you only get charged for the time that your virtual machine is running.
- 25 different data centers: One of the best things that you will notice when you go to Vultr is the list of different data centers that they offer. You have the option to select from one of their 25 different data centers around the globe.
Read also how to create a WordPress website on Vultr.
That being said. let’s dive right in.
Step 1: Sign up for Vultr
If it’s your first time launching a server on Vultr you need to sign up first, and you can get $100 free credit when you use our link. We also get a small commission so, it’s a win-win.
If you already have an account you can go to step two to create the server.
To sign up for Vultr go to Vultr.com. Enter your email address and password and Create an account or click Sign up to enter an email and password.

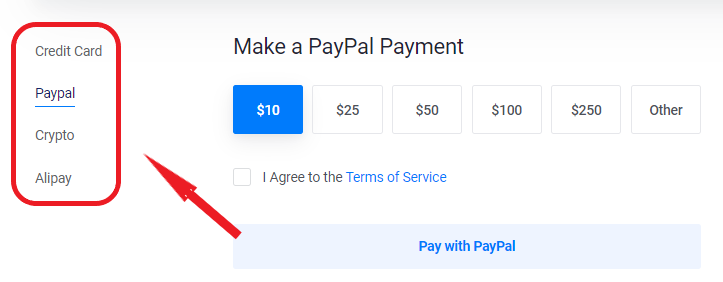
Once you click Create account you will be redirected to the billing page where you should enter a valid payment method. This could be your Credit card, PayPal, Crypto, and Alipay.
You will be invoiced with the amount of money you choose and it will be stored as credits on your account to use in future billings, to make sure that your payment method is working.
Once you enter your preferred payment method, you can now create the servers you want. And if you used this link before signing up, you will see the $100 free credit right there.

Once you set everything right, go to your email inbox to verify your email address. Just click on Verify your E-mail and you are all set.
Now, you are ready to deploy your first server on Vultr and host your PHP script.
Step 2: Deploy a server and add an application
The way to create your PHP application in Vutlr is to first create an instance and install an operating system on it, and then install an application that works right with the PHP scripts.
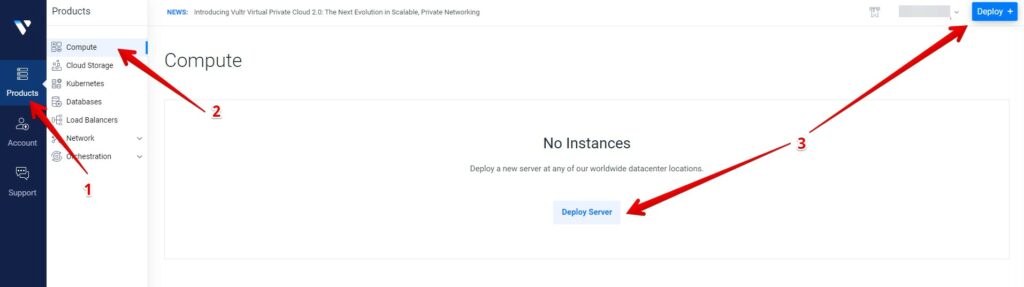
So, to create a server hover over the (+) sign on the right side of the Vultr dashboard or go to Products in the left main panel.
You will be headed to the first option of the Products bar, which is Instances. If you have not yet created instances “servers”, you will see no servers in the instances tab.
Next click Deploy Instance.
Choose server type:
The first thing you will see when you create a server on Vutlr is the server type. You need to select the server type that fits your application needs.
Vultr offers four main server options, they are Optimized Cloud Compute, Cloud Compute, Cloud GPU, and Bare Metal Servers. And each one has different plans you can choose from.
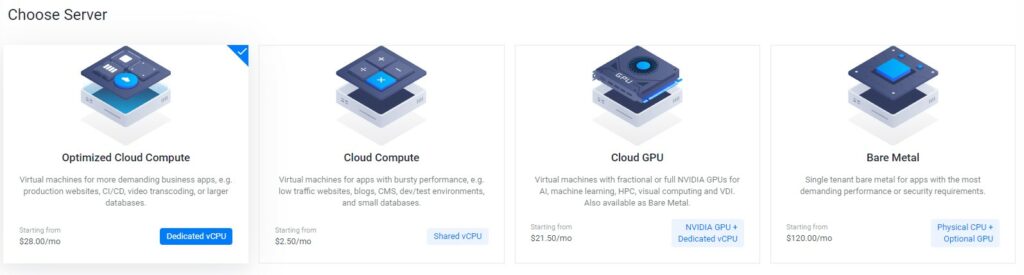
The shared CPU Cloud Compute is quite enough for small to medium business and blog websites, and it’s the cheapest plan. So, the Cloud Compute server type is the best option in this example.
When you choose the Cloud Compute server type, you will see four options for the Cloud Compute, these are AMD High Performance, intel High Performance, High Frequency, and Regular Performance.

The Regular performance is powered by a regular SSD and processor, and the plans start at $5 per month, while the others are powered by the new NVMe SSD and new CPU generations, and their plans start at $6 per month.
Choosing one of them depends on your decision, but in general, there are no big differences between them in performance since all of them are using SSD disk storage.
Choose server locations “datacenter”:
The next step is to choose the server location of your website.
Vultr offers 25 data centers around the world to host your website on any of them. So make sure to choose the nearest one to your targeted customers.
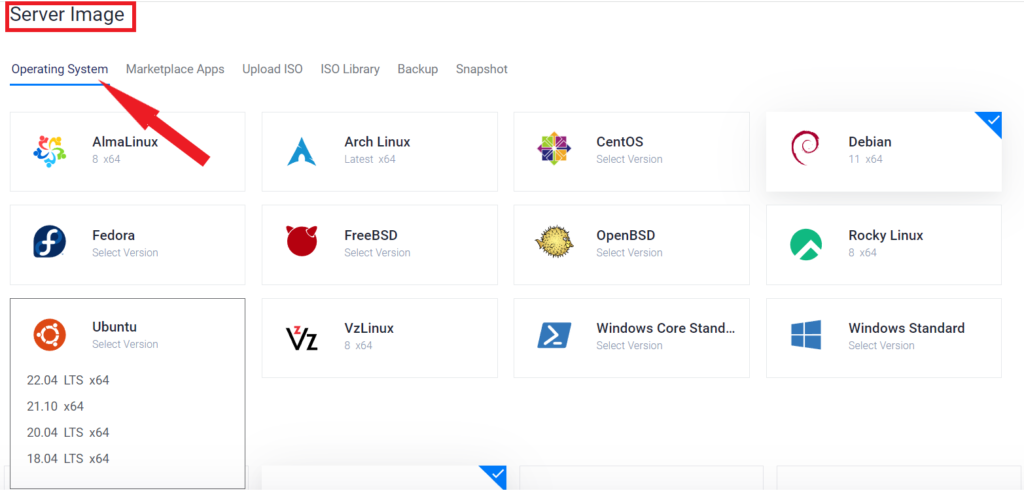
Choose server Image “Operating system”:
Server operating systems are responsible for managing the hardware and software resources of a computer system. They are also responsible for providing an interface to applications and other programs that use these resources.
In other words, the server operating system is an operating system that runs on a server. It is used to manage network resources and provide a platform for running applications.
Vultr has tons of ready-to-install operating systems. You can choose Debian or Ubuntu’s latest version for your PHP script. I will use Ubuntu in this tutorial.
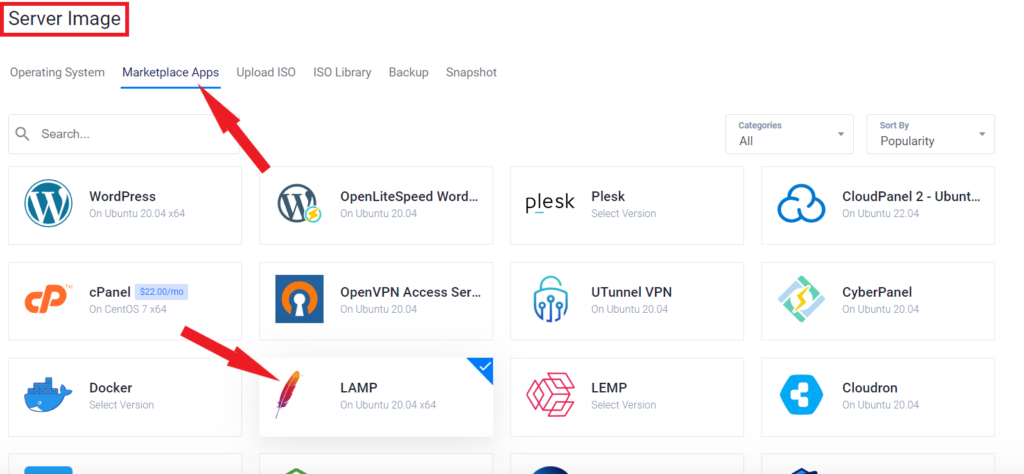
Choose server application:
Next, you can install an application on top of the operating system to help you with certain tasks.
Server applications are software that is installed on a server and they are often used to provide specific functionality or services to other computers.
You can use the 1-click install applications to let Vultr installs the application automatically and make things ready for you.
In this example, I will choose the LAMP application, because it will automatically create all the directories that are necessary for the PHP script.
Choose server size “Plan”:
Now it’s time to choose the server resources size such as the RAMs, the CPUs, the Bandwidths, etc
If you follow my previous steps and choose the Cloud Compute server type, you will see plans like the image below.
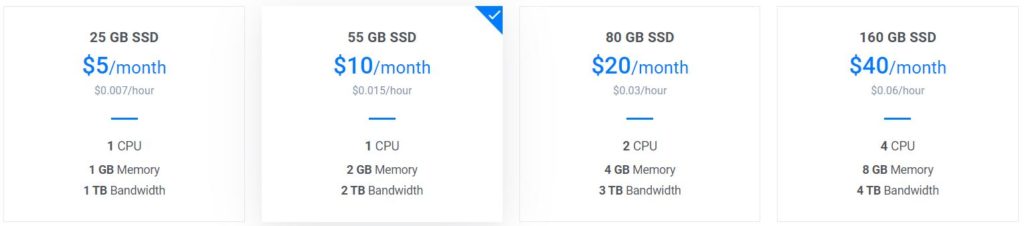
These plans are for the Regular Performance option. If you know what to choose based on your website needs, you are free to choose whatever plan you need.
But if you don’t know what to choose, go with the $5/month plan. It’s quite enough for small websites and you can scale up later when you grow up your business.
Add Auto Backup:
when you select the plan you want, scroll down to the Vultr auto-backup option.
Server backup is the process of making a copy of all the data on a server so that it can be restored in case of a website crash or hacker attack.
Server backup is important because it can protect your data from being lost or corrupted. If you don’t have server backup, then you risk losing your data if there is an issue with the hardware or software.
Vultr adds an additional 20% cost of your origin server cost when enabling the data backup, but it’s worth it as it guarantees your effort backup. So, enabling this feature is an excellent choice.
Add Server Hostname & Label:
The last thing you want to do before launching your server on Vultr is to set the server hostname and the server label. This should be your domain name.
Enter your domain name “example.com” in the field so you don’t need to edit it later when you want to install the SSL certificate.
Finally, click Deploy Now.
Now the server is being created. In the meanwhile, make up your domain name to point to your server.

Step 3: Point your domain to the Vultr server
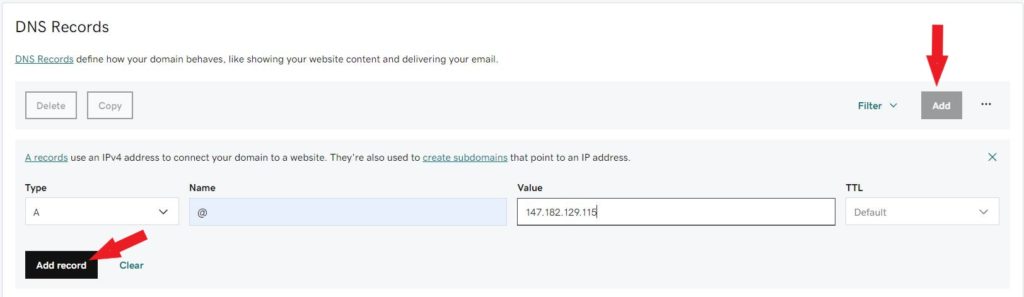
While letting Vultr establish the server for you, you need to point your domain name to your server adding an “A” record to your domain DNS settings.
The A record provides a mapping between a domain name and an IP address. It is used to resolve any DNS queries for the domain name.
To point your domain name to your server you have to add or edit the existing A record with your Vultr server IP address.
First copy the IP address of your server. You can find your server IP address within your server information bar on Vultr.
Next, go to your domain DNS settings and add an “A” record or edit it if it already exists.
Step 4: Install the free Let’s Encrypt SSL certificate
To complete the server configuration and install the free Let’s Encrypt SSL certificate on the Vutlr server you need to access the server via an SSH terminal such as Putty. Download Putty and install it.
But first, give the domain name two minutes or so to fully propagate with the IP address and the server.
When you install Putty and launch it, enter your server IP address and the port should be “22”. Next click Accept as it’s your first time accessing this server on this device via Putty.
Once the Putty terminal opens, login as your username which is root by default on Vultr. Hit enter and then enter your root password as given in the Vultr server dashboard.
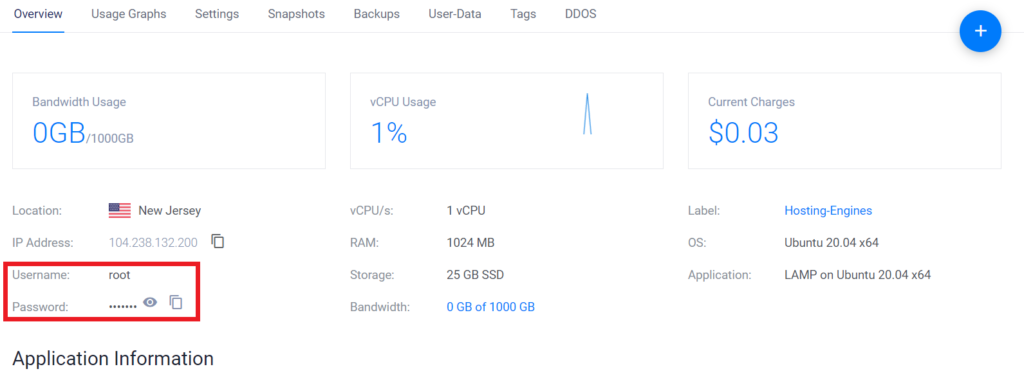
To pull up the server dashboard just go to Products and then click on the server that you want to see its info and data.
Once you logged in, you will see the general information about your servers such as your operating system and other data.
Since we used Ubuntu in this example, we will do the Ubunto SSL certificate installation method.
To install the free SS: certificate on Ubuntu enter the below lines each one at a time and hit enter each time.
- Install Certbot:
apt update && apt install certbot -y- Request Wildcard Certificate. Change the example.com with your domain name.
- Enter your email address whenever Certbot asks for it.
certbot certonly --manual \
     -d *.example.com \
     -d example.com \
     -m [email protected] \
     --preferred-challenges dns --agree-tos \
     --no-eff-email --manual-public-ip-logging-ok
You will be asked to add a TXT record to your DNS records. Go to your domain DNS settings and add a new TXT record. The name will be “_acme-challenge.example.com” insert your domain name instead of example.com.
The Value will be generated automatically by the Certbot and printed it on the screen when you reach this point. Just copy and paste it into the TXT record value and save the record.
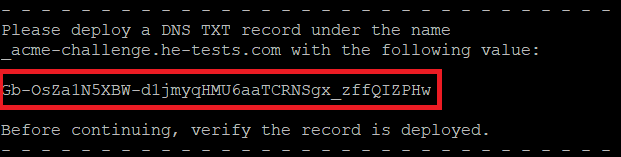
Next, hit enter once to continue. The Certbot wizard will pause at this point. Do not press ENTER until you test that the TXT record is propagated properly.
Once you make sure that the TXT record is propagated properly, press enter to complete the SSL certificate installation.
- Install Certificate for Apache: Run the following commands:
- Archive the existing Apache certificate.
mv /etc/apache2/ssl/server.crt /etc/apache2/ssl/server.crt.oldmv /etc/apache2/ssl/server.key /etc/apache2/ssl/server.key.old- Link the Let’s Encrypt certificate where Apache expects to find it:
ln -s /etc/letsencrypt/live/example.com/fullchain.pem /etc/apache2/ssl/server.crtln -s /etc/letsencrypt/live/example.com/privkey.pem /etc/apache2/ssl/server.key- Restart Apache:
service apache2 restartNow, your Vultr server should be SSL secured and ready to install the PHP script on it.
Step 5: Upload your script to the Vultr server
After we have things set up with the server, now it’s time to work with the script. We need to upload the script files to the Vultr server that we created. Here’s how you can do that.
1- Get the PHP script source code ready:
The first thing you need to do when uploading the PHP source code to the server is to get all files ready to be uploaded.
Download your PHP script if it’s from CodeCanyon or any source that you have and Zip the PHP files in a ZIP file “not RAR”. so you only upload one file instead of all files avoiding missing some files and the time that the PHP files take.
Don’t ZIP the main file as a whole, instead, ZIP only the content that is inside the main file, so it won’t extract them as a subfolder.
2- Upload the PHP script to the Vultr server:
To upload the PHP source code to your Vultr server you need to access the server via SFTP clients such as WinSCP or FileZilla. These small apps will let you access your server files after you enter your server credentials.
First, download any SFTP client and launch it. In this example, I will be using FileZilla.
Next, in Filezilla, enter your server IP in the Host field, root for the Username, and the server password in the Password field, 22 in the Port field, and finally click Quickconnect.
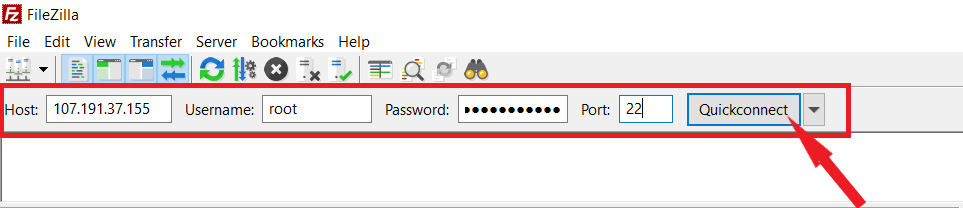
Now, you should find yourself logged in to your server and can browse your server files.
Next, go to the “html” directory where you should upload your PHP script.
In the right part of FileZilla the “Remote site” part, you will find yourself in the root folder. You can either click on the “/” to go step back and scroll down to (var > www > html )
Or copy this path “/var/www/html” and paste it into the “Remote site” bar to take you to the “html” directory.
Once you are in the html directory, drag and drop the zipped PHP file that you created earlier into the directory and wait until it finishes the copy.
3- Unzipp PHP script:
After you copy the zipped PHP source code inside your Vultr server you need to unzip and extract it so that you can get your PHP files in place.
There are two ways to unzip a zipped file inside the Vultr server. One way is by using an Unzipper file with an SFTP client, and the other way is by some commands in an SSH terminal.
I will explain them both so you can choose what feel it’s easier for you.
Unzip with the SFTP method:
To extract the zipped files inside the targeted folder, you need to upload an unzipper file to the same targeted folder.
Download the Unzipper file below and extract it to your computer, and then upload the “unzipper.php” file the same way you upload the PHP script.
Next, go to “example.com/unzipper.php” in your browser to open the Unzipper page. You should see something like this image below.
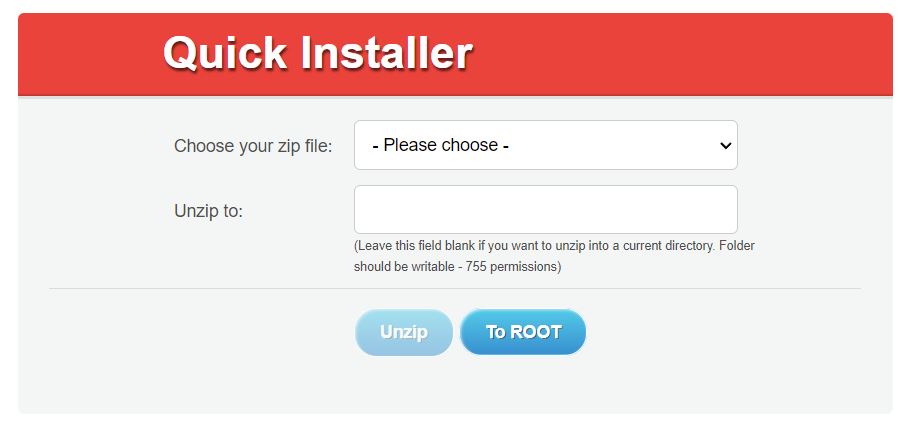
Next, choose your PHP zipped file and then click Unzip. If you want to extract the zipped file in another folder you should choose the folder before unzipping the package.
Now your PHP script is unzipped and you can delete the zipped file and the Unzipper file from your server.
Unzip with the SSH method:
Unzipping through an SSH terminal is not difficult as well. Open Putty, and enter your IP address as we did before. After that, enter the root for the username and the server password and click enter to login.
Next, enter this command and hit enter to install the Unzip file inside the server.
sudo apt install unzipWait for the unzip installation to complete.
Next, change the directory from the root folder to the PHP script folder “/var/www/html” as we did in the server connection with FileZilla. Enter the following command to do so.
cd /var/www/htmlRun the following command to list the files in your html folder. You should see your zipped file listed, otherwise, there’s something wrong.
lsLastly, unzip the file by entering the next command. Replace the “name.zip” with your file name.
unzip name.zipNow you configured your Vultr server and uploaded the PHP script to the server. The only thing left is to install the PHP script.
Step 6: Install the PHP script
This can only be done by you as every PHP script has a different installation method. But in general, all PHP scripts come with their installation guide.
All you have to do now is to go to the installation guide of your PHP script and follow the guide.
Host PHP script on Vultr: The Conclusion
Vultr has made it very easy, affordable, and powerful to host and install PHP or any application.
So, installing a PHP script and hosting it on Vultr can be done without spending too much time and money.
Follow this guide carefully and you will find yourself with a great PHP website and a solid Vultr server.