Installing WordPress on Linode is a great way to build a powerful and customizable website. It’s also easy and achievable even for non-developers. And in this informative article, I’ll make sure that you do it the best way.
In this article, we will guide you through the process of setting up a Linode server and installing WordPress on it.
We will cover everything from creating a Linode account and deploying a server, to configuring the server for WordPress and installing the software.
Whether you’re a beginner or an experienced developer, this guide will provide you with the knowledge and steps you need to get your WordPress website up and running on a Linode server.

About Linode:
Linode is a cloud hosting provider that offers reliable virtual private servers (VPS) for hosting websites and other web-based applications.
It allows users to rent a virtual server on which they can install and run their own operating system, software, and applications.
Linode provides a variety of server options, including different amounts of storage, RAM, and CPU power, so users can choose the configuration that best suits their needs.
Users can also scale their server up or down as needed, making it a flexible and cost-effective solution for hosting websites and other web-based applications.
Linode focuses on providing developer-friendly platforms. Its products and services enable developers and businesses to build, deploy, and scale applications more easily and cost-effectively in the cloud.
Because of the affordable prices, the great customer support, and the many features and solutions, Linode now is one of the most used web hosts.
Linode Performance
Before you start creating your WordPress website on Linode, let’s have a small brief about its performance and reliability.
Linode is known for providing high-performance virtual private servers for hosting websites and other web-based applications. The company uses high-performance hardware and fast network infrastructure to provide its customers with fast and reliable servers.
Linode uses a custom-built Linux kernel and optimizes the network stack for high-speed performance. They also have a custom-built storage platform for faster I/O and storage, which allows for faster access to data.
Overall, Linode is known for providing high-performance servers that are reliable, fast and scalable, which makes it a popular choice among website developers and online business owners.
Uptime:
Uptime is an essential feature in any web host, poor uptime brings down your server so it can’t be accessible, which leads to unhappy customers and search engines.
Linode provides a 99.99% uptime guarantee on all Linode hardware, and on network connectivity. If your server on Linode is down for more than 0.01%, you may request a pro-rated credit for the downtime.
Loading speed:
The old gold rule, Fast website > Fast grow > Fast money. Although Linode has not yet introduced a premium server like its competitors do DigitalOcean Premium and Vultr High Frequency, it’s still the fastest cloud hosting.
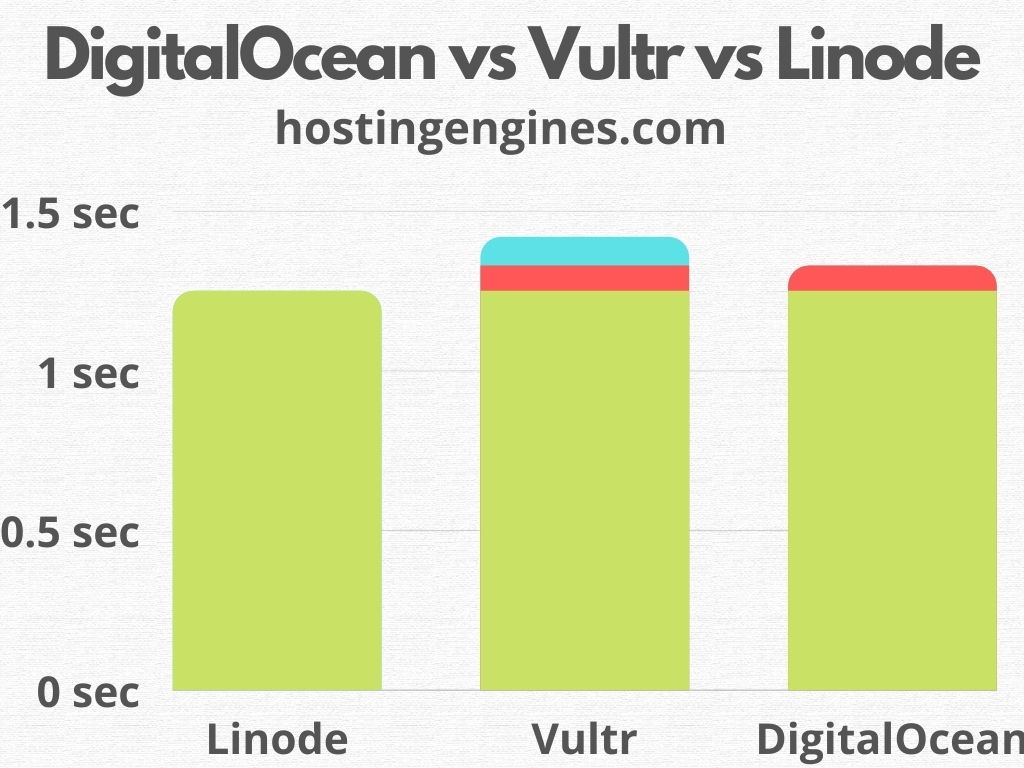
We ran speed tests on the same WordPress site that we used as an example in this tutorial. We installed the Blocksy Theme and installed a starter site that has a lot of big large images to slow down the website.
Also, We did not make any WordPress optimization. Neither cache plugins, nor CDN and image optimization. And then, we did the tests.
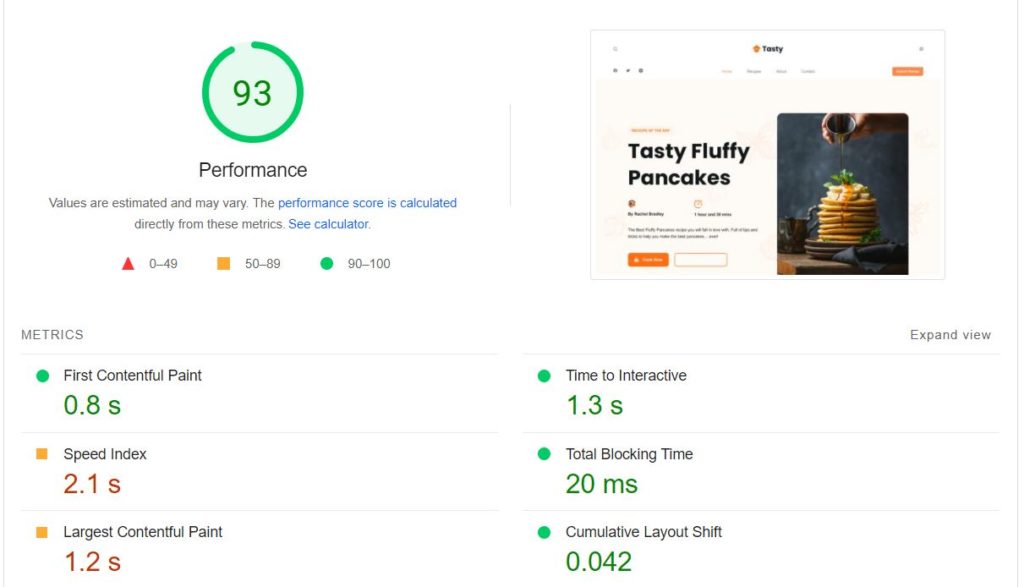
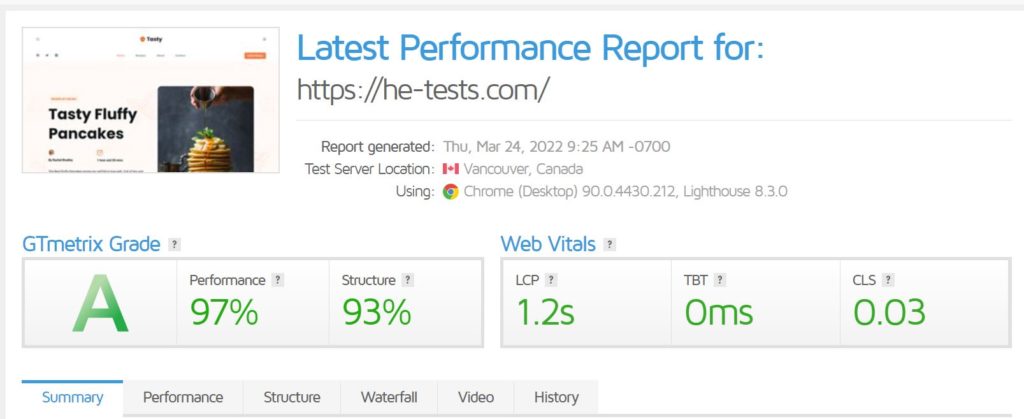
we did the tests on Google PageSpeed Insights and the GTmetrix tool. The Largest Contentful Paint for both is 1.2 seconds.
Google PageSpeed Insights Test:
GTmetrix Speed Test:
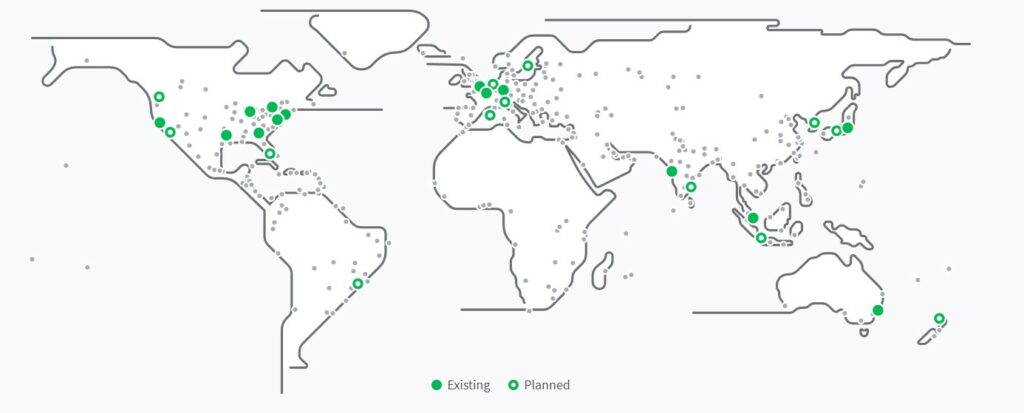
Data centers:
Linode operates 11 data centers in seven different countries and serves 185 countries around the world.
More data centers mean the best website delivery to customers. Rest assured, your website performance is way better with Linode.
Now that we learned a little about Linode, let’s dive into our goal, install WordPress on Linode VPS. Starting with Step one: Signup for Linode
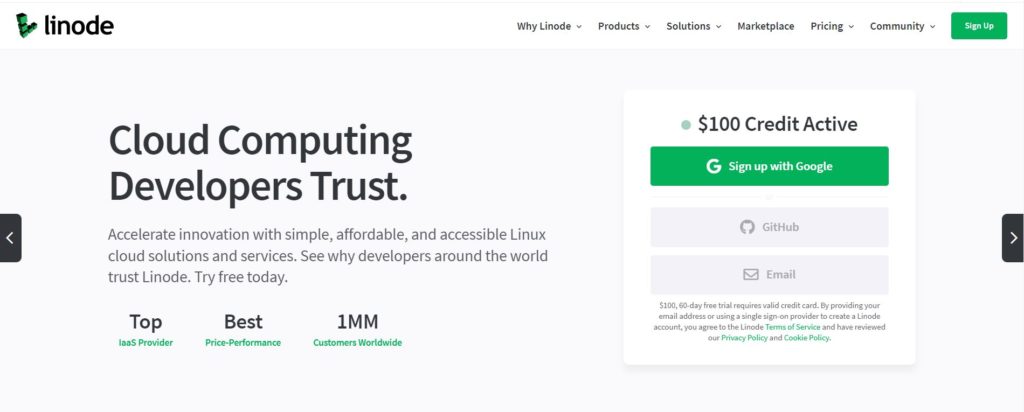
Step 1: Sign up for Linode
To sign up for Linode got linode.com. Use the link to get a $100 free credit for 60 days if it’s your first time signing up for Linode.
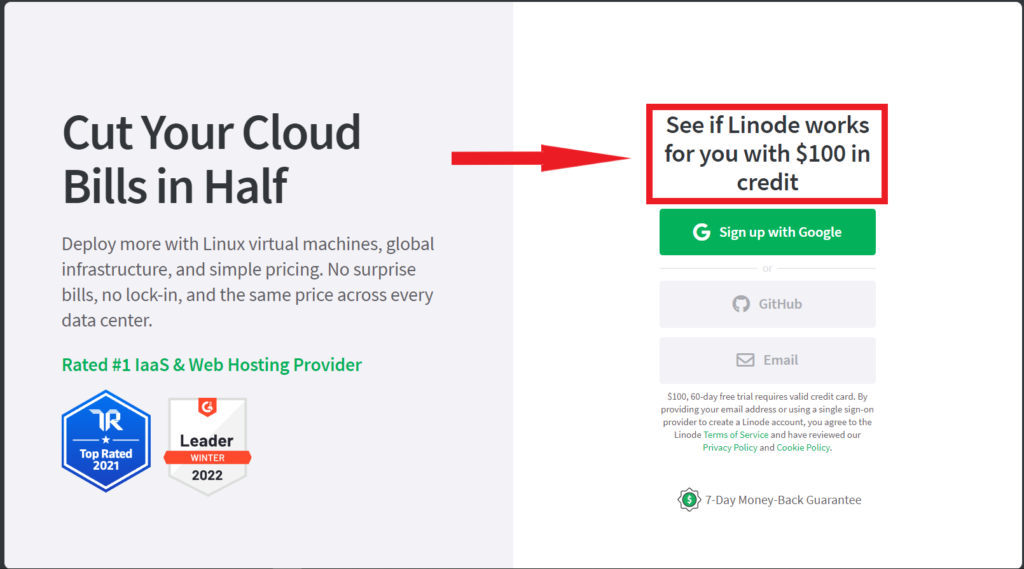
Click sign up with Google, GitHub, or by Email. Then verify your email address. No need to verify your email address if you are going to sign up with Google.
Once you confirm your email address you will be redirected to the billing page where you will have to enter your personal billing information and payment information. Next, click Create Account.
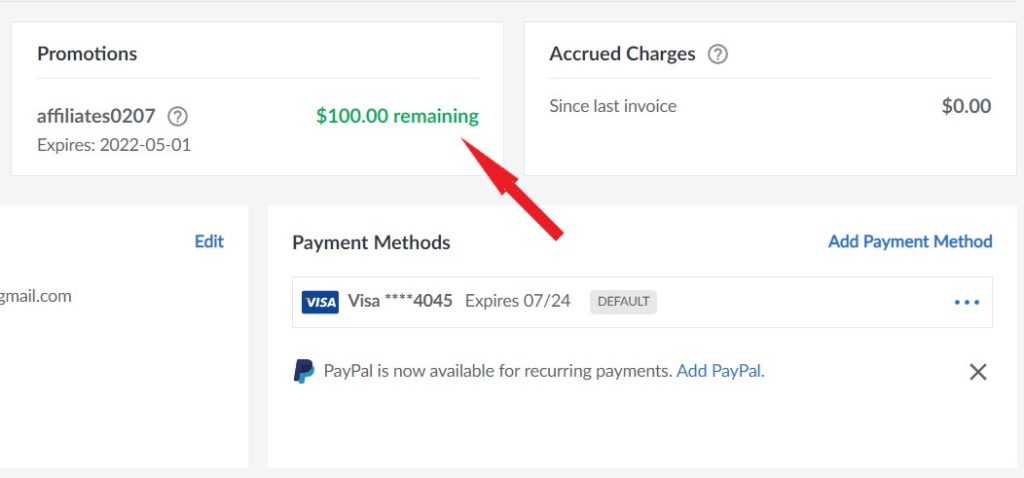
When you log in to your account and go to the Billing tab on your Account, you will see the $100 free promotion has been added to your account.
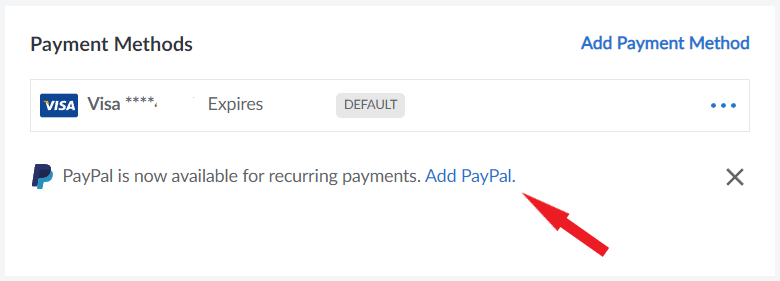
Linode says that “maintaining a valid credit card on file with your account is a requirement”. However, when you sign up for the first time with a valid Credit or Debit card, you can add the PayPal payment method later.
Step 2: Create a VPS and Install WordPress
In order to install WordPress on Linode, you first need to create a VPS server and then host the WordPress on that server.
To create a server on Linode login to your Linode account. Next, on the Linodes tab on the left sidebar click Create Linode.

Once you click on Create Linode, all the settings that you will need to follow to create the server will show up. Let’s break them down one by one.
First: Choose an image and application:
The first option that you want to configure on your server is to choose the Image of your application. By default it’s Debian.
Now Linode supports Ubunto, you can change the image to Ubunto if you like, you can leave it as Debian the default option by Linode. Anyway, the process is the same.
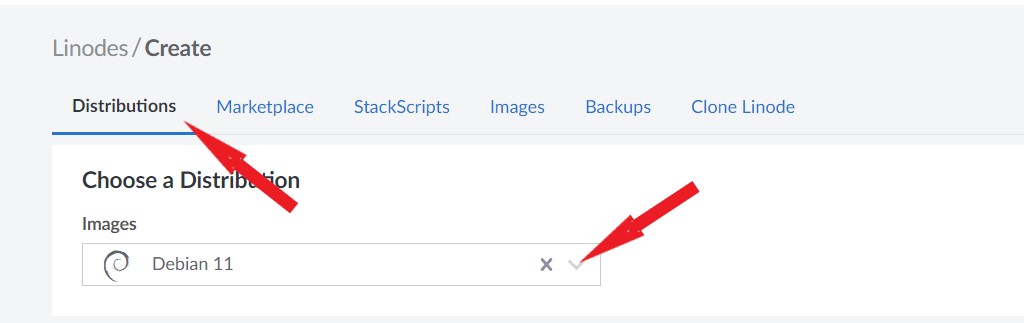
Next, you want to choose an application to install on top of the Image. In your case, you want to install WordPress.
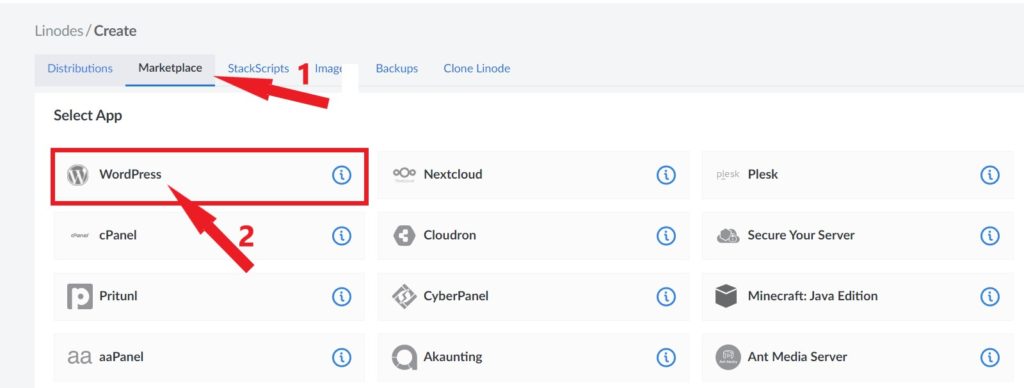
To install WordPress go to the second tab on Distribution, the Marketplace, where you will find all different types of applications including WordPress.
Once you are in there, select WordPress which will be the first option. Then, scroll down to the next settings.
Second: Configure WordPress options:
When you scroll down after you select WordPress, you will see a bunch of important settings that you need to configure regarding the WordPress that you want to create.
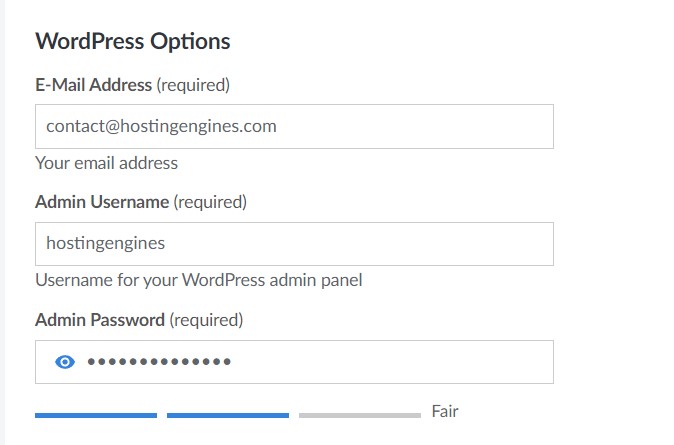
The first three options are the WordPress credentials. When you want to login to your WordPress after installation, you need to enter these credentials.
The first field is the Email Address, enter your email address. And the second and third options are the Username and Password of the WordPress admin that you want to create. Enter these credentials wisely and save them for later use.
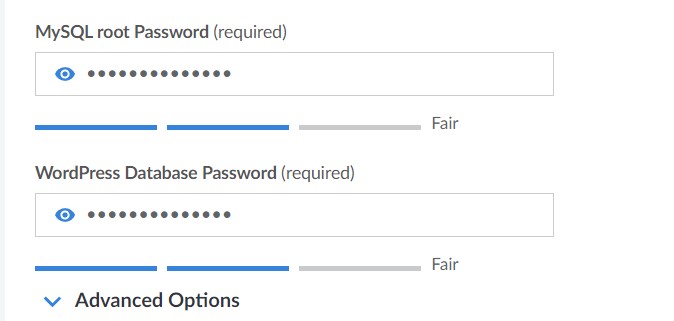
The next passwords are for developers who want to work further with the server. If you are a beginner, you are probably not going to use them. But anyway, they are required, so you have to add them.
- The MySQL password is for your MySQL connection. When you want to login into your MySQL data you will be asked for it.
- The Database Password is for your Database access. When you want to login into your database files you will be asked for it.
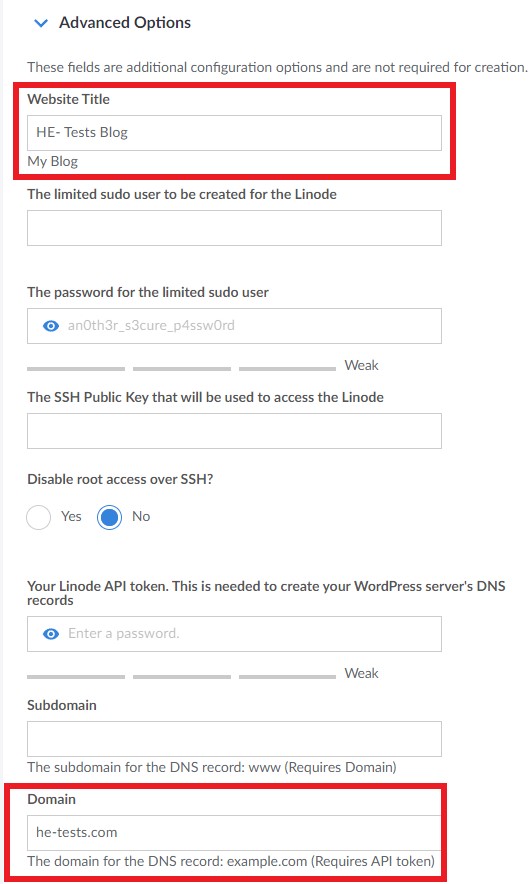
In the advanced options, enter your WordPress website name and your domain name. The rest of the settings leave them as they are.
Entering your domain name now will make it easier for you and Linode to place your domain on the server configuration and the WordPress settings automatically. So you don’t have to do that manually later on.
Third: Select server region “data center”:
You shouldn’t just pick any region, think twice before you select a server data center for your website. Select the closest server location to your customers.
Yes, the difference is very little, but it’s noticeable when you get loads of traffic. And it can impact your website performance.
If you target an audience from India, then choose the Mumbai server. But if your potential customers would be in the United States, there are four data centers in the United States and you can select the closest one to your clients.
To select a region click on the Select a Region rectangle to choose one of the 11 data centers that Linode provides.
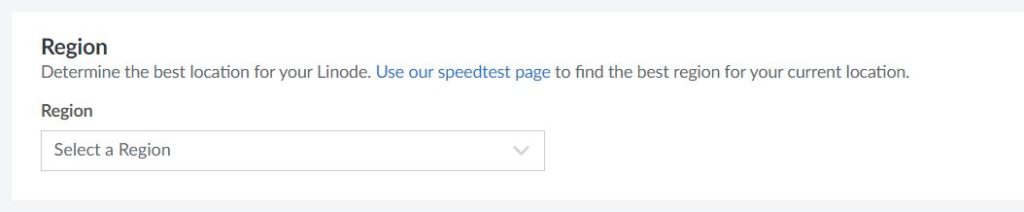
Also, if you are not sure to determine what’s the best region for your server, you can test each data center using the Linode speed test tool to see their performance.

Fourth: Select server plan:
Linode cloud host provides a variety of web hosting plans and pricing you can choose from according to your and your website needs. It categorizes its plans into four main categories these categories are:
- Dedicated CPU Plans: Run on their own CPU cores in the Linode infrastructure. No sharing the processor with other instances. It is meant for big eCommerce websites (full-duty workloads).
- High Memory Plans: Offer a cost-effective way to run memory-intensive applications on dedicated CPUs. It’s a perfect choice when you need more RAM without increasing storage or vCPUs.
- GPU plans: On-demand GPUs for parallel processing workloads such as machine learning, scientific computing, and video processing.
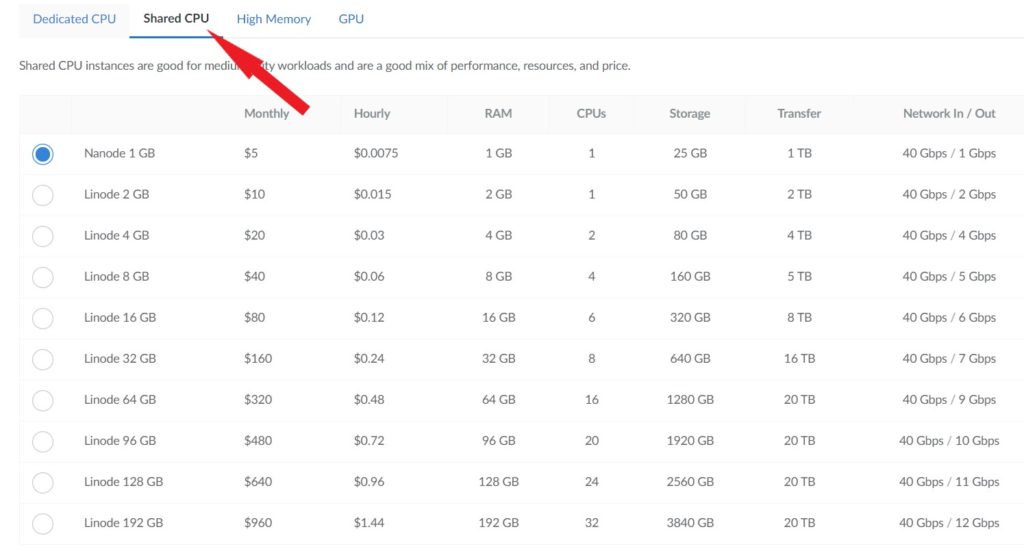
- Shared CPU (VPS) Plans: Ideal for general workloads and include generous amounts of free bundled transfer. You share the CPU but you have your own dedicated resources such as RAM, Storage, and Bandwidth.
If you run a new or small to medium blog or a business website, the Shared CPU plans are the perfect choice for you. It is affordable and delivers high performance.
To choose the plan for your WordPress website click on the Shared CPU tab in the Linode Plan section. this will show you all the shared plans.
The first plan 1 GB RAM for $5 is quite enough for the WordPress application unless you have already tons of traffic coming to your website every day. And you can upgrade your server plan at any time.
For the $5 plan, you will get 1 GB RAM, 1 CPU processor, 25 GB storage space, and 1 TB bandwidth.
Select the plan that you feel suits your needs best then scroll down to the next option.
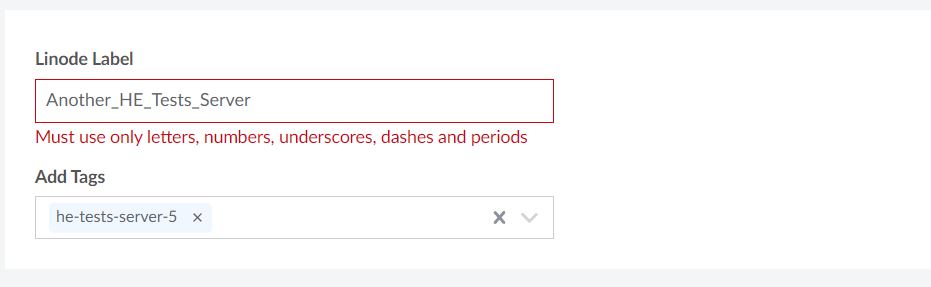
Fifth: Add name and tag to the server:
This option is all about sorting servers when you have plenty. From the Linode Label, add a name to your server. And from the Add Tags, you can add tags to your server to fetch them later on when you have lots of them.
Sixth: Root password and SSH key:
The Root Password is essential, you will need it when you want to access your website files via SSH or SFTP to add or edit settings on your server. Also, you may want to use it to complete the WordPress setup later on if you prefer using a third-party terminal.
Same as the root password, the SSK Key gives you a connection to your server, but the concept of this key is different. Instead of using letters and numbers passwords, the SSH key provides pair of keys, a public key, and a private key.
The public key is placed on the server and connected via an SSH client with a private key configured. When both keys match up, you can log in to your server without the need for a password.
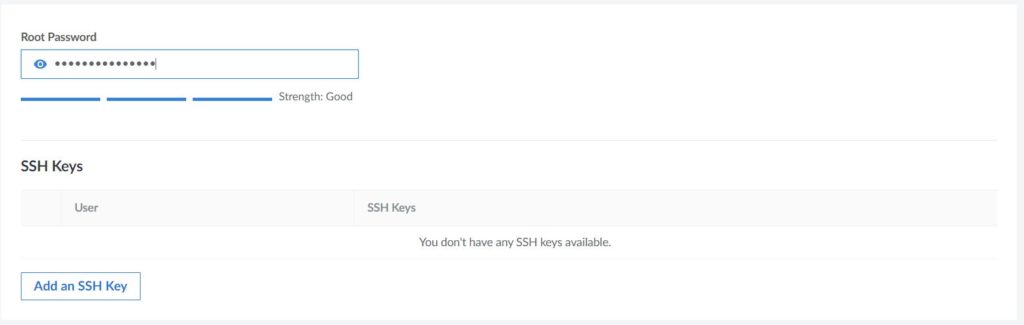
If you don’t know how to deal with the SSH Key, use the Root Password for now.
To setup a Root Password just enters the root password you want then scroll down to the next option. No need to Attach a VLAN. Next up, Add-ons.
Seventh: Add-ons:
From the Add-ons options, you can enable the Backups feature. It’ll add more fees to your server billing ($2 for the $5 server plan) but it’s an essential feature. Without the Backups turned on, you won’t guarantee website safety and restoration.
The Private IP is supposed to work within the local network, it’s neither routed on the Internet nor traffic can be sent to it from the Internet. So, no need for it for now.

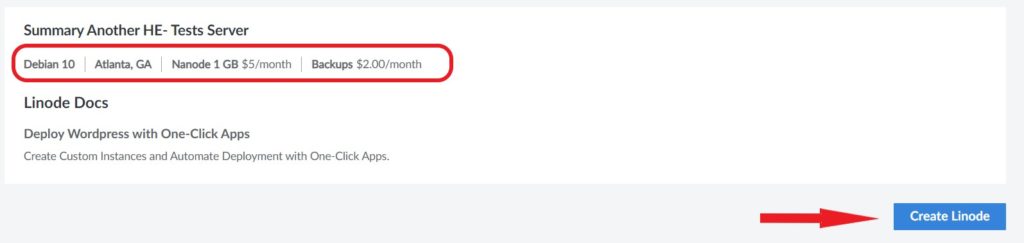
Linode server and WordPress creation summary:
This is the last section that you will see when installing a Linode server. It will show you the main options that you have chosen for your server.
The Summary section will show the Image of your server, the region of your server, the Plan of your server, and the Backups if enabled. Also the application you have chosen for your server.
When you are certain of your choices, click Create Linode to deploy the server.
Installing the server won’t take long, seconds for the server to run, and a couple of minutes for your WordPress to be fully installed.
In the meantime, point your domain name to your server. And that’s what leads to step three.
Step 3: Point Your Domain to Your Server
Now your server is running and your WordPress website is accessible via IP Address. Nonetheless, you have to point your domain name to this server.
Linode doesn’t offer domain name registration. If you don’t have a domain name yet, register a domain name from any domain name registrar such as NameCheap.
To point your domain name you need to add an “A” record to the DNS settings of that domain name. The “A” record maps a domain name to the IP address. So whenever someone clicks on your domain name, he will be directed to your website.
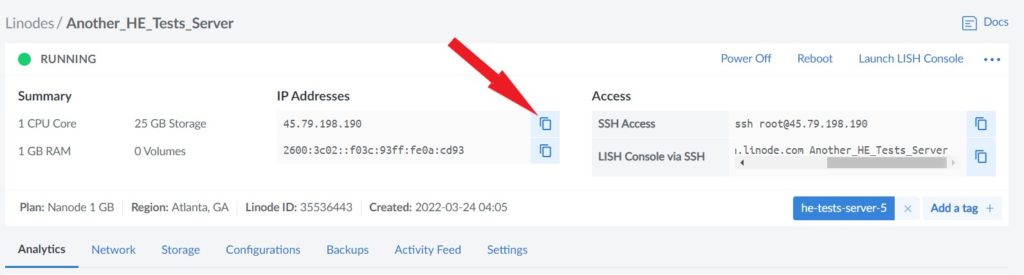
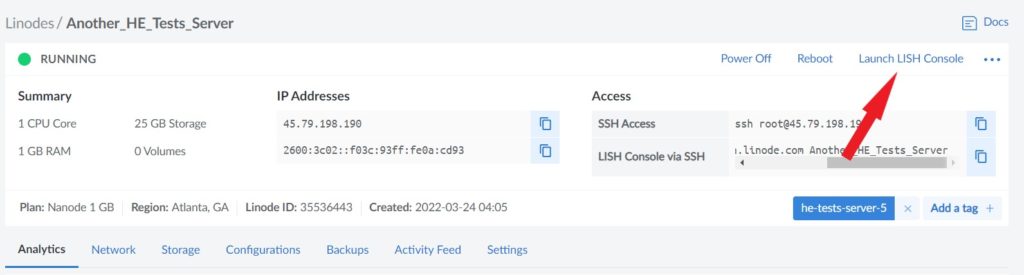
First copy the IP address of the server you created. When you first launch the server, you will be in the server dashboard. You can find all your servers on the Linodes tab on the main left sidebar control panel. Click on the copy icon beside the IP address to copy your IP address.
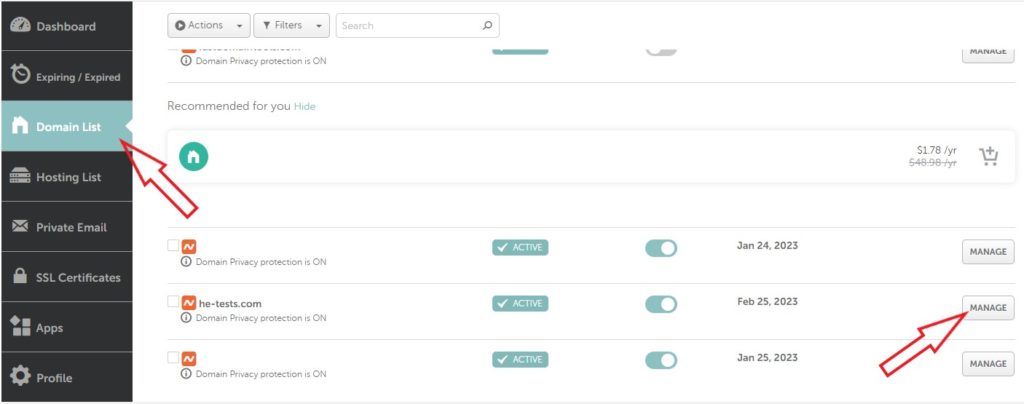
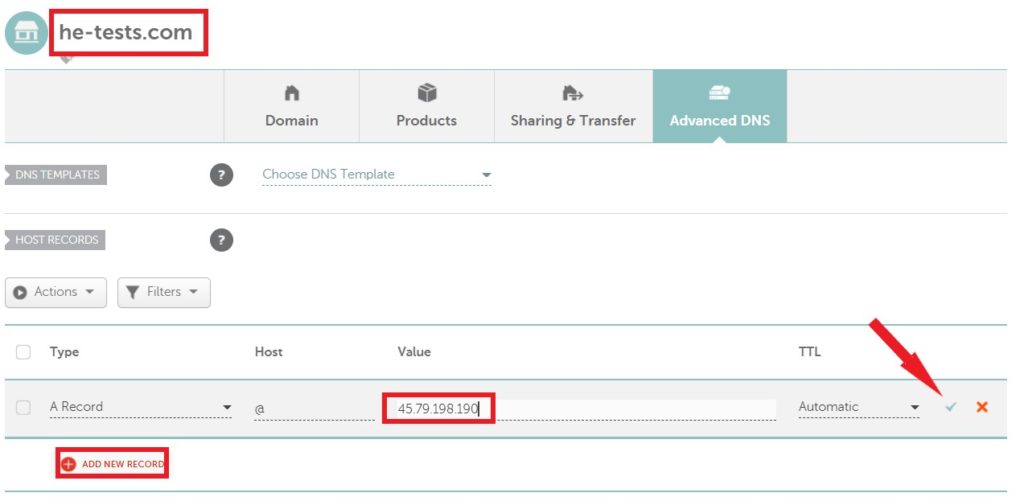
Next, go to where your domain name is hosted, then go to the DNS settings or the advanced settings or whatever your domain name registrar calls it. After that, click Add a Record, and select the “A“ record.
In the Host field, add the “@” sign. This represents the origin domain. Next, paste the IP address of the server you copied earlier into the value field. If you lost it go back and copy it again.
Wait a couple of minutes to let Linode fully install WordPress and your domain propagate with the new IP address.
Now your domain name is pointing to your WordPress website, but WordPress is not yet completely installed. Now it’s time for step 4 of how to install WordPress on Linode VPS.
Step 4: Install Let’s Encrypt SSL Certificate
SSL certificate is an important feature for your website, it encrypts the connection between your website and the visitors, so they trust your website. Also, Let’s Encrypt is a free SSL certificate provider.
But! Before you start installing the SSL certificate make sure that your IP address is fully integrated with your domain name.
To configure and install the free SSL certificate on Linode, you need to access your server via SSH. You can use Linode Console, or use another terminal such as Putty. At this point, you need the root password you created earlier to access your server.
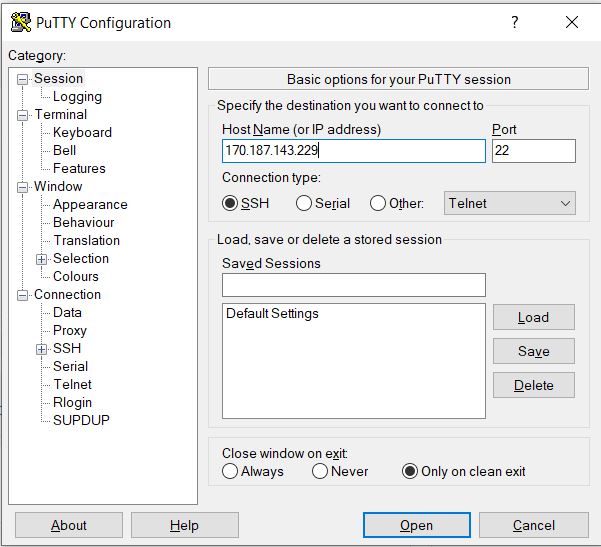
In this example, I’ll use Putty. Install putty from this link and open it. Once you open it, copy your server IP address and paste it into the box under Host Name. The port by default is 22. and the connection type is SSH. Next, click Open.
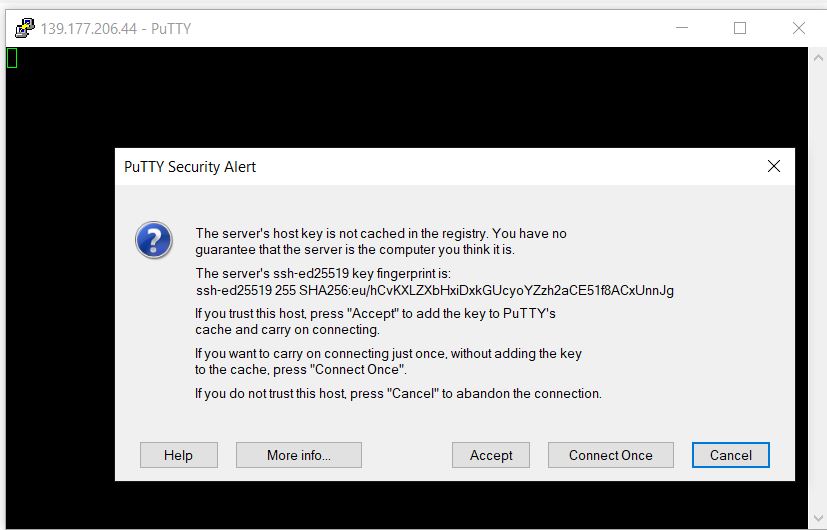
When you log in to the server via Putty for the first time, you will see a security alert. Click accept to continue.
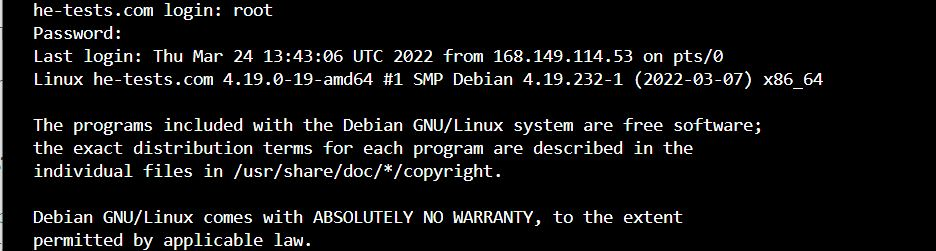
To access the server, type root then hit enter. next type in the root password you created earlier then hit enter. At this point, you should login and see your server information.
Since I used Debian for this server, the following verses are working with the Debian image. However, if you have chosen Ubunto, read this article to know how to install the free SSL certificate on Ubunto.
Next, enter these commands, every time you enter a command press enter if it needs, and use one verse at a time.
- Install snapd.
sudo apt update
sudo apt install snapd
When you enter the second line, you will be asked if you want to continue, enter (Y) for yes, and hit enter to install snapd.
- Install the core snap.
sudo snap install core
sudo snap refresh core
- Use Snap to install Certbot.
sudo snap install --classic certbot
- Configure a symbolic link to the Certbot directory using the
lncommand.
sudo ln -s /snap/bin/certbot /usr/bin/certbot- Request a certificate and automatically configure it on Apache.
sudo certbot --apacheOnce you do all the verses above, your SSL certificate should start installing automatically. Nevertheless, there are some easy-to-do options you should make.
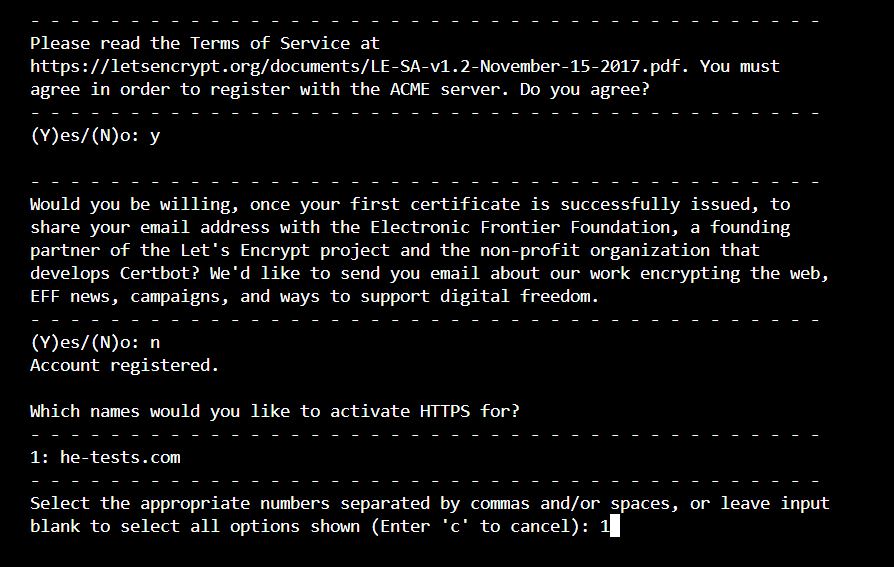
After you enter the last command, you will be asked for your email address for renewal and security purposes. enter your domain name and press enter.

Next, agree to the Terms, enter Y for yes, and hit enter. After that, sharing your email address, choose to share it (Y) or not (N).
Lastly, you will be asked for which domain you want to activate the SSL certificate, type the number of the domain.
Since I only have one domain on this server, it showed me the only domain I have. enter 1 and hit enter.
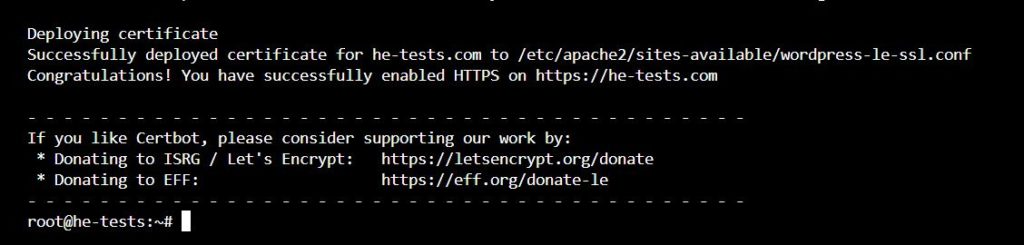
When you go through all the settings above, the SSL certificate should be installed successfully and your website should be encrypted and protected.
The Conclusion
Linode is a reliable cloud computing service that has a stunning reputation. And installing WordPress on Linode is a relatively straightforward process that can be completed in just a few steps.
With the proper setup and configuration, you can have a fully-functional WordPress site up and running on your Linode in no time.
Follow the tutorial’s steps above and you will have your own WordPress website live without a help of a developer. Read also: Install WordPress on DigitalOcean and install WordPress on Vultr.
Frequently Asked Questions
The following questions are the most asked questions about Linode cloud computing:
Does Linode require a credit card?
Yes, it’s required for the first time. maintaining a valid credit card on file with your account is a requirement of the Linode Master Services Agreement.
Does Linode support Paypal payments?
Yes, Linode supports Paypal recurring payments. However, for the first users, Linode requires registering via Credit or Debit card.
How do I delete a Linode server?
On the server dashboard, click on the last tab Settings. Then scroll down to the bottom of the page. You will see the Delete Linode option, click Delete. Deleting a Linode will result in permanent data loss.
Is Linode better than DigitalOcean and Vultr?
We can’t say that from the surface, the three of them seem identical, but there are a few differences between them. Read the Linode vs DigitalOcean vs Vultr comparison.