
Do you want to install the Let’s Encrypt free SSL certificate on a Vultr server?
Well, here are the steps you should follow to secure your website with an SSL lock for free on any Vultr server in a simple and easy approach.
By following these steps you should be able to install the Let’s Encrypt free SSL certificate on WordPress, on Ubuntu with Apache, and on Ubuntu with Nginx in no time.
But before that, let’s explain some terms.
What is Vultr?
Vultr is a cloud hosting provider that offers a wide range of servers and hosting solutions for web developers, designers, and businesses. It runs 33 data center regions worldwide (Milan became the 33rd in May 2026).
Also, Vultr provides its customers with an easy-to-use interface that allows them to manage their servers with ease. Read Vultr review.
What is an SSL certificate?
Secure Sockets Layer “SSL” certificate is a digital certificate that is used to encrypt and protect data transmitted between a web server and a browser. It is also known as an HTTPS certificate. The protocol doing the work today is actually TLS, the successor to SSL, but almost everyone still says SSL. Here’s how SSL/TLS certificates work if you want the details.
An SSL certificate provides the assurance that the website you are visiting is secure and safe to use. It also helps secure web servers, encrypt email messages, and ensure website security.
An SSL certificate can be purchased from a third-party provider, or self-signed by the website owner, or provided by Let’s Encrypt for free.
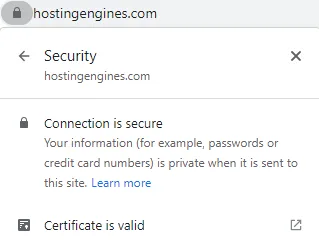
What is the Let’s Encrypt SSL certificate?
Let’s Encrypt is a free, automated, and open certificate authority that provides free certificates to people who want to protect their websites with encryption. This means that anyone can easily encrypt their website for free by using Let’s Encrypt.
Let’s Encrypt makes web security easier and more secure by allowing anyone with a domain name to obtain an SSL certificate without having to go through any complicated process or pay a lot of money.
That being said let’s see how we can install a free SSL certificate on any Vultr server.
Point your domain name to the Vultr server IP address
This is crucial, before you can install the SSL certificate on your application you have to point your domain name to your server IP address.
Without your domain name mapping to your server IP address, you can’t install an SSL certificate to your domain name.
You can point to your domain name by adding an “A” record to your domain DNS records or editing the existing one.
The A record is a DNS record type that is used to map an IP address to a domain name. So when someone types your domain name, the domain will direct him to your server application.
To point your domain name to your Vultr server simply copy the IP address of your server, which you can find under Products > Compute in the Vultr dashboard.
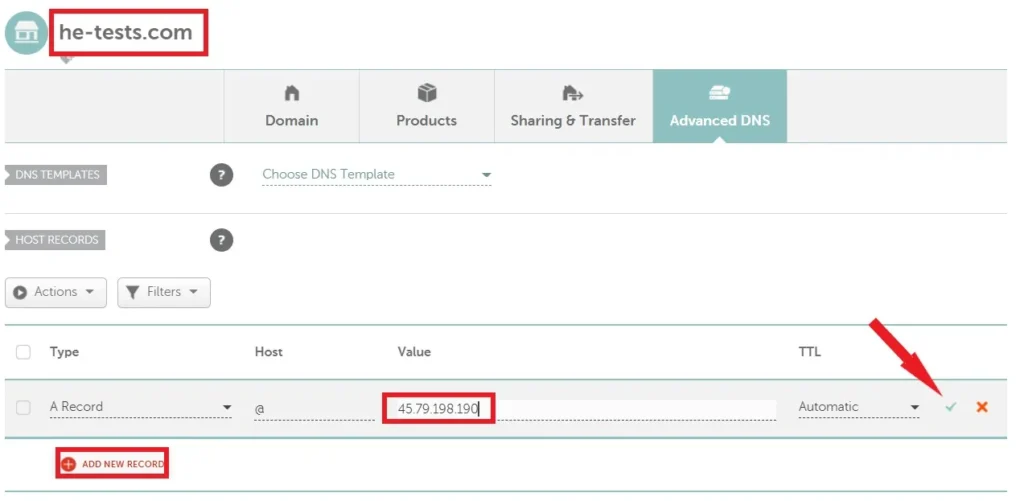
Next, go to your domain admin platform and then to your domain DNS settings to create an A record or edit the existing one.
Click Add New Record > Choose A Record, type your domain name or “@” in the Host field, paste the server IP address in the Value field, and finally click the YES sign to save the record.
If there’s already an A record, click in the Value field and paste the IP address of your Vultr server and save the record.
It may take some time for the new DNS record to fully propagate, so give it some time before you start installing the SSL certificate.
There are small differences when installing the Let’s Encrypt SSL certificate on certain operating systems such as Ubuntu, Debian, Apache, or Nginx.
So make sure that you are following the installation process of your application operating system. You can check it from your server tab on your Vultr dashboard.
Install Let’s Encrypt SSL certificate on 1-click WordPress app on Vultr
This section will show you how to install the Let’s Encrypt free SSL certificate on the 1-click WordPress application on Vultr. If you installed the 1-click WordPress app on a Vultr server, follow these steps.
1- Log in to your server via SSH terminal:
The first thing you should do to install a Let’s Encrypt free SSL certificate on the WordPress application on Vultr is to access your server root via SSH terminal.
You can either use Vultr Console or use a third-party app such as Putty.
Log in to your Vultr server as root. Enter the username “root” and hit enter, also enter the password that Vultr generates for you and hit enter.
You can find the root password on your server’s Overview page, just under the server info (Products > Compute, then click your server).
2- Run Certbot:
Use the following command to run Certbot, which requests the certificate and sets up Nginx to use it. Copy and paste it inside the SSH console.
certbot --nginx --redirect -d example.com -d www.example.com -m [email protected] --agree-tosReplace example.com with your domain name, and [email protected] with your own email.
Once you run this command, the certbot wizard should start installing the SSL certificate and may ask you for some information.
Follow the wizard setup process and you should be able to successfully install the free Let’s Encrypt SSL certificate on your WordPress application on the Vultr server.
3- Verify Automatic Renewal:
Let’s Encrypt SSL certificates last for 90 days by default, so without renewal your certificate expires after about 3 months. That window is getting shorter: the default drops to 64 days on February 10, 2027 and to 45 days in February 2028. Let’s Encrypt also stopped sending expiry reminder emails in June 2025, so automatic renewal is your only safety net.
To make sure that the certbot will renew the SSL certificate automatically run the following command.
Verify the timer is active.
systemctl list-timers | grep 'certbot\|ACTIVATES'Or verify the crontab entry exists (depending on how Certbot was installed, renewal runs from either a systemd timer or a cron job, so one of these two checks should find it).
ls -l /etc/cron.d/certbotVerify the renewal process works with a dry run.
certbot renew --dry-runThis is how you can install the Let’s Encrypt SSL certificate on the 1-click WordPress application on a Vultr server with ease.
Install Let’s Encrypt SSL certificate on Ubuntu with Apache on Vultr
This section will show you how to install the Let’s Encrypt free SSL certificate on Ubuntu with Apache on Vultr. If you deployed an Ubuntu operating system with Apache on a Vultr server, follow these steps.
1- Log in to your server via SSH terminal:
The first thing you should do to install the Let’s Encrypt free SSL certificate on Ubuntu with Apache on Vultr is to access your server root via SSH terminal using Vultr Console or a third-party app.
Log in to your Vultr server as root. Enter the username “root” and hit enter, also enter the password that Vultr generates for you and hit enter.
You can find the root password on your server’s Overview page, just under the server info (Products > Compute, then click your server).
2- Install Certbot on the server:
First, we need to install Certbot, the free tool that requests and installs the certificate for you. Enter the following commands one at a time and press Enter after each one.
Verify snapd is up to date.
sudo snap install core; sudo snap refresh coreRemove certbot-auto and any Certbot OS packages.
sudo apt-get remove certbotInstall Certbot with Snap.
sudo snap install --classic certbotLink Certbot to /usr/local/bin so the certbot command works.
sudo ln -s /snap/bin/certbot /usr/local/bin/certbot3- Install SSL Certificate:
Now it’s time to run the certbot to install the Let’s Encrypt SSL certificate. Follow the commands below to install the certificate on Apache.
Run Certbot for Apache.
certbot --apache --redirect -d example.com -d www.example.com -m [email protected] --agree-tosReplace example.com with your domain name.
After the setup starts, follow the instructions that the certbot shows on the screen.
4- Verify Automatic Renewal:
Let’s Encrypt SSL certificates last for 90 days by default (and that’s dropping to 45 days by 2028), so automatic renewal really matters.
To make sure that the certbot will renew the SSL certificate automatically run the following command.
Verify the timer is active.
systemctl list-timers | grep 'certbot\|ACTIVATES'Or verify the crontab entry exists (depending on how Certbot was installed, renewal runs from either a systemd timer or a cron job, so one of these two checks should find it).
ls -l /etc/cron.d/certbotVerify the renewal process works with a dry run.
certbot renew --dry-runThis is how you can install the Let’s Encrypt SSL certificate on Ubuntu with Apache on a Vultr server with ease.
Install Let’s Encrypt SSL certificate on Ubuntu with Nginx on Vultr
This section will show you how to install the Let’s Encrypt free SSL certificate on Ubuntu with Nginx on Vultr. If you deployed an Ubuntu operating system with Nginx on a Vultr server, follow these steps.
Before Certbot can set up HTTPS, Nginx has to know your domain name. That goes in the server_name line of your site’s configuration.
Here’s how to set it and then install the certificate.
1- Log in to your server via SSH terminal:
The first thing you should do to install the Let’s Encrypt free SSL certificate on Ubuntu with Nginx on Vultr is to access your server root via SSH terminal using Vultr Console or a third-party app.
Log in to your Vultr server as root. Enter the username “root” and hit enter, also enter the password that Vultr generates for you and hit enter.
You can find the root password on your server’s Overview page, just under the server info (Products > Compute, then click your server).
2- Install Certbot on the server:
First, we need to install Certbot, the free tool that requests and installs the certificate for you. Enter the following commands one at a time and press Enter after each one.
Verify snapd is up to date.
sudo snap install core; sudo snap refresh coreRemove certbot-auto and any Certbot OS packages.
sudo apt-get remove certbotInstall Certbot with Snap.
sudo snap install --classic certbotLink Certbot to /usr/local/bin so the certbot command works.
sudo ln -s /snap/bin/certbot /usr/local/bin/certbot3- Install SSL Certificate:
Now it’s time to run the certbot to install the Let’s Encrypt SSL certificate. Follow the commands below to install the certificate on Nginx.
If your server_name doesn’t list your domain yet, set it first, before you request the certificate.
Run this command to go to the Nginx configuration and edit the server_name
nano /etc/nginx/sites-available/defaultEdit the server_name to include your domain name.
server {
    server_name  example.com www.example.com;
Replace all the example.com with your domain name. Save and exit the file.
Run Certbot for Nginx.
certbot --nginx --redirect -d example.com -d www.example.com -m [email protected] --agree-tosReplace example.com with your domain name.
After the setup starts, follow the instructions that the certbot shows on the screen.
4- Verify Automatic Renewal:
Let’s Encrypt SSL certificates last for 90 days by default (and that’s dropping to 45 days by 2028), so automatic renewal really matters.
To make sure that the certbot will renew the SSL certificate automatically run the following command.
Verify the timer is active.
systemctl list-timers | grep 'certbot\|ACTIVATES'Or verify the crontab entry exists (depending on how Certbot was installed, renewal runs from either a systemd timer or a cron job, so one of these two checks should find it).
ls -l /etc/cron.d/certbotVerify the renewal process works with a dry run.
certbot renew --dry-runThis is how you can install the Let’s Encrypt SSL certificate on Ubuntu with Nginx on a Vultr server with ease.
Read also:
Install WordPress on Vultr.
Host PHP on Vultr.