Looking to host a PHP script from CodeCanyon or any other source on Cloudways web hosting because it’s faster, ultra-scalable, and a reliable infrastructure?
The process of hosting and installing PHP scripts on Cloudways is so easy, to the point that you don’t have to make any hard configuration. Everything is set up and ready.
By following the steps below, you will be able to install any PHP script on Cloudways in minutes. But first, let’s explain some phrases:
What is PHP?
PHP is a popular computer programming language that allows developers to quickly create dynamic websites and web applications. It was created by Rasmus Lerdorf in 1994.
PHP is a server-side scripting language, which means that it runs on the server instead of the client machine.
This makes PHP easy for developers to use because they don’t need to worry about compatibility issues with different operating systems or browsers.
What is Cloudways?
Cloudways is a cloud hosting platform that provides one of the best hosting services in the world. It is one of the fastest-growing cloud hosting services and it offers excellent customer support with loads of features.
Cloudways is the best choice for businesses and individuals who need a reliable, scalable, and cost-effective solution for their web presence. Read Cloudways review.
Step 1: Sign up for Cloudways
The very first step is to sign up for Cloudways. When you sign up for the frist time, Cloudways will give you a 3-day free trial to test their services, and no credit card is required.
If you have an account on Cloudways you can skip to step 3.
To signup for Cloudways go to Cloudways.com and click start free to start the free trial and you can upgrade to premium later.
After that, enter your personal information to create the account, the name, email, password, etc. Or you can just choose to sign up with Google, GitHub, or LinkedIn.
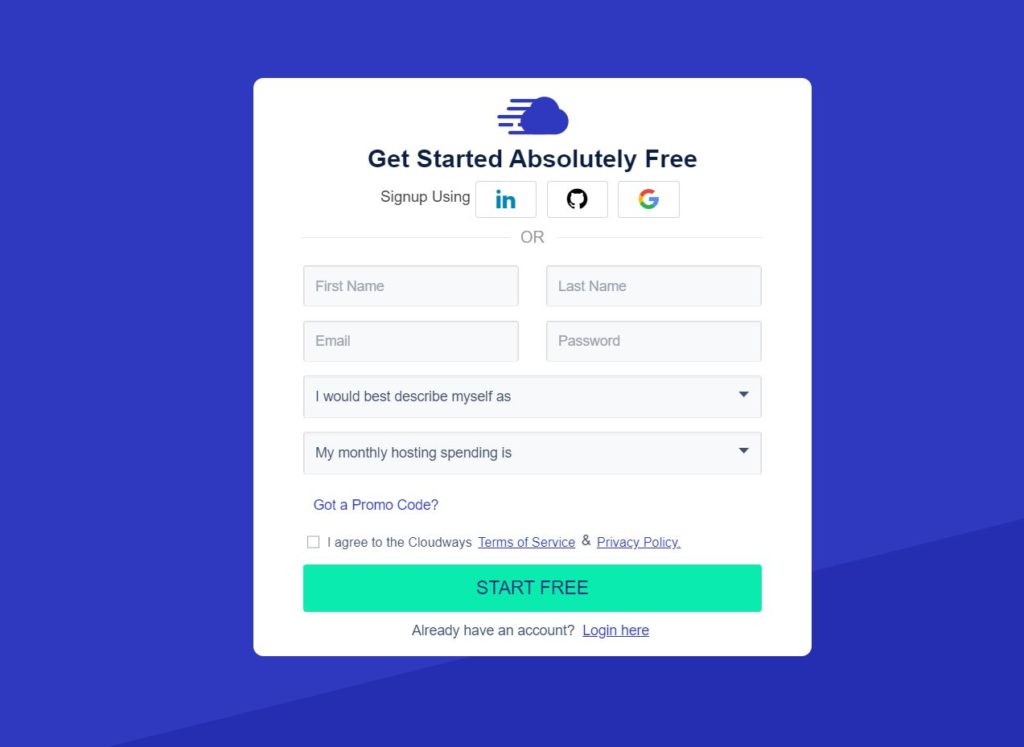
The following step is to confirm your email address and enter a phone number and confirm it as well.
Once you do all that, your Cloudways account will be ready and available to use and deploy your PHP script or other apps.
Step 2: Create a Server
Deploying a server has always been a fun part of Cloudways, it’s easy, intuitive, and gives a lot of flexibility that you won’t find on other platforms.
From five different platforms, you can choose to host your next PHP script on Cloudways easily. These platforms are Vultr, Linode, Digitalocean, Amazon Web Services, and Google Cloud Platform.

And with the 3 days free trial that Cloudways offers, you can deploy a server using one of these great companies, each at a time.
For new users, once you sign up, Cloudways pulls up these 5 companies to choose one of them as your server provider. Also, you have to create your first application with the server setup, as there’s no need for the server if it has not any application.
Cloudways shows the server providers, the server size, and the money you will be charged after the end f the trial.
To deploy the server you need to choose the server provider. Next, choose the server size.
By dragging the toggle bar right and left, you can increase and decrease the server size such as the RAMs, CPUs, and Network.
The last thing you need to do when choosing the server is to choose the server location. The data center varies from one server provider to another, try to use a server location that’s close to your audience.
Once you choose the server location now it’s time to setup your PHP application to make it ready for the PHP script that you want to create.
Step 3: Add PHP application on Cloudways
Cloudways provides many 1-click install applications including WordPress and PHP. Since we want to host a PHP script, we need the PHP application.
For new users who have not created servers on Cloudways yet and are following the step one and step two, here’s how you can do it:
Add PHP application for new Cloudways users:
Just over the server provider, you will see the application details. The first option is the Application type. Click on it to see all the applications that Cloudways offers, navigate to Custom PHP and select it.
Next, enter a name for the application, it could be the same name as your PHP application.
After that, name the server that you want to create such as PHP Scripts Server, or First Server. This will help you arrange and recognize them, and you can change these names later on.
Last but not least, click on Select your Project to create a new folder in order to sort your applications on it. For instance, a Project with the name “My PHP Apps” or “My WordPress Websites”.
Once you do all that, click Launch Now to create the server and the PHP script at the same time.
Add PHP application for old Cloudways users:
For old users who already have created a server and want to deploy the new PHP application on the old server, it’s a little different. You will only need to create the PHP application and host it on the same server.
To create a PHP app on an existing server click on the plus sign on the upper part of the dashboard where you can create and add all stuff to your Cloudways account.
Next, click Add Application.
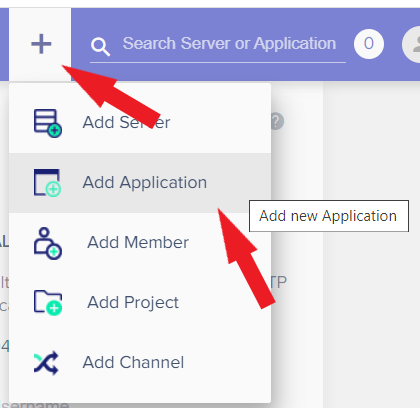
Next, select the server that you want to host the PHP script on it, and then click Add Application.
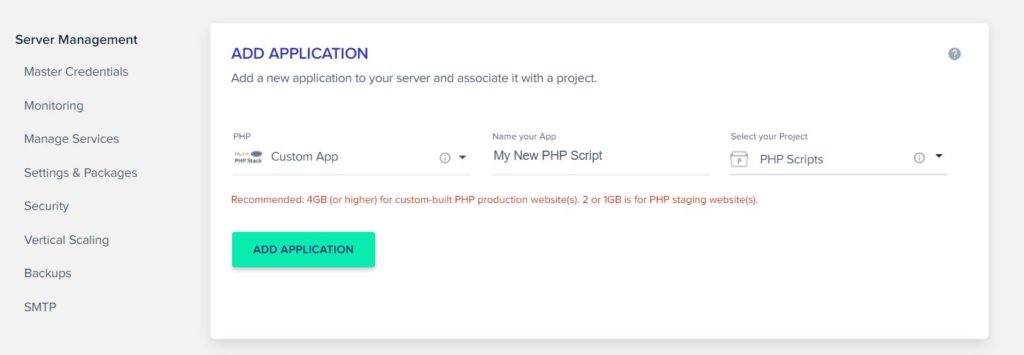
When you do that, a new page where you will choose your application and name it will show up.
Click on Select Application and scroll down to the Custom PHP and select it.
Next, click on Name your App to give it a name to recognize it later.
Next, click on Select your Project to sort this app with a particular group if you want to.
At last, click Add Application.
Now your PHP application is fully installed, so, it’s time to go to the Control Panel of the application to configure it before you upload your PHP script.
Step 4: Configure the PHP application
Configuring the application before you install the PHP script is important, it saves you a lot of time and trouble.
This includes pointing your domain name to your website, adding your domain name, and installing the free SSL certificate on Cloudways. Here’s how you can configure your PHP app on Cloudways:
Point your domain to the Cloudways server:
The first thing to do when configuring an app on Cloudways is to point your domain name to your server so that when visitors enter your domain.
Cloudways doesn’t provide a domain registration service, so you have to buy and register your domain name in other hosting providers such as NameCheap.
To point your domain to your Cloudways server you need to add an “A” record to the DNS records of your domain. So when visitors visit your site through your domain name, the “A” record of the domain name directs them to your website.
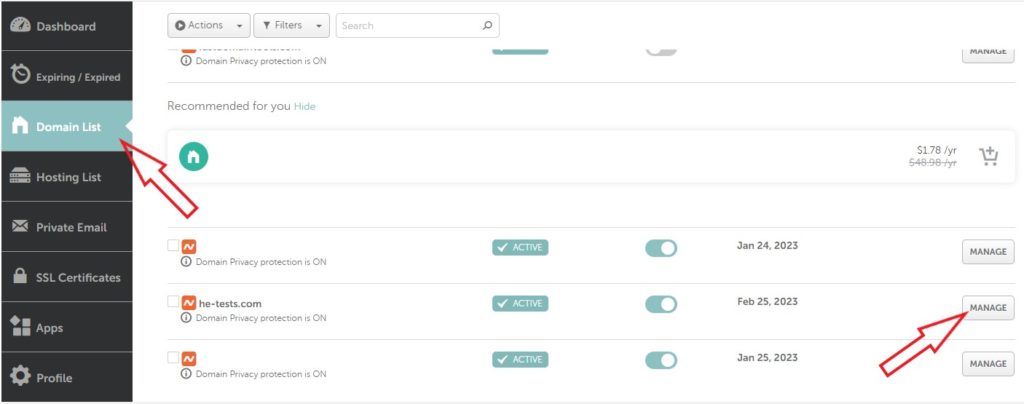
To do that you need to go to your domain hosting provider, go to your domain name, then the DNS of the domain name.
Next, add an “A” record. In the Name or the Host field, enter the “@” symbol, and in the Value or the IP Address field enter the IP address of your Cloudways server.
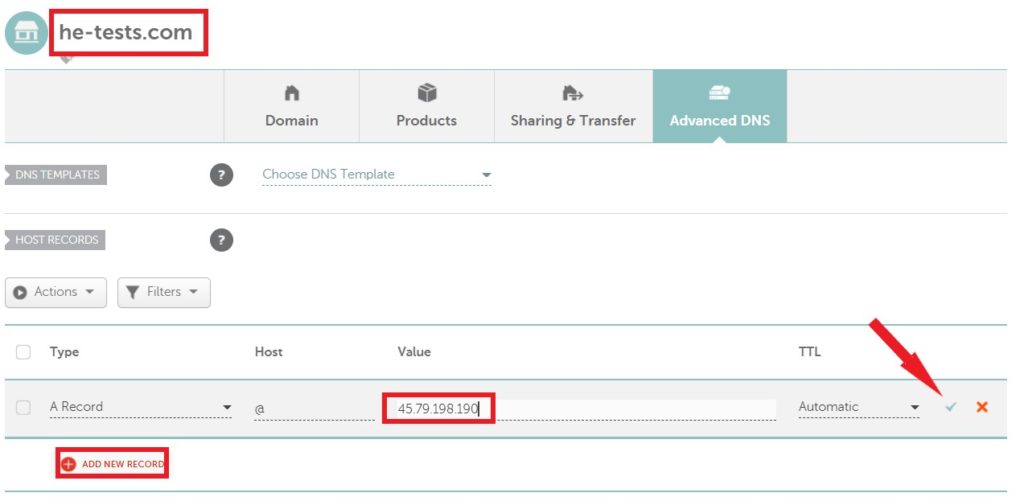
To copy the IP address of the Cloudways app or server simply go to the Server Management dashboard or the Application Management, click on it and it will automatically be copied to the clipboard.
If there’s already an “A” record on your DNS, edit it to point to the new Cloudways IP Address, as you can’t add more than one A record.
If you want in detail on how to point your domain name on GoDaddy, Cloudflare, or on Namecheap, give this page a visit.
Add your domain to the Application Management:
This is a simple process you have to do.
Cloudways provides one IP address for the entire Server, which means that all the apps and sites on that server have the same IP address.
So, Cloudways wants to make sure when you point the domain name to the server IP address, it takes visitors to the right website. That’s why you must add your domain name to your application management.
To add your domain to your website, click on the website to take you to Application Management.
Next, navigate to Domain Management and open it.
Just under the PRIMARY DOMAIN enter your domain name and then click Save Changes.
Install free SSL certificate:
The SSL certificate is important for all websites to look safe for visitors. Cloudways offers both the free Let’s Encrypt SSL certificate and the premium certificate.
In this tutorial we want the free, here is how you can install it.
Again from the application management navigate to the SSL Certificate and open it.
In the Email Address, enter the email address you want Cloudways to notify you with after the end of the certificate to renew it again.
In Domain Name, type your domain name. Click Install Certificate and your website is SSL secured.
Step 5: Get the PHP script source code
Your PHP app should be by now hosted and installed successfully on a Cloudways server and your domain name is pointing to the PHP app.
Now it’s time to make the PHP source code ready to be uploaded to the PHP website.
Download the PHP script, if you got your PHP script from CodeCanyon go to the Downloads section to download it.
The script probably contains many files, so it’s better to upload it one time in a zipped file rather than one file at a time. This could take ages.
Also, you need the part of the script that you want to upload to be zipped on the surface of the file, not inside a folder, so when you upload it to the PHP app it won’t be in a sub-directory.
That said, let’s see how we can upload it to the root folder of the PHP script.
Step 6: Upload the PHP script to the server
To install the PHP script first we need to upload it to the server. And to upload the PHP script to the Cloudways server you need three things; an SFTP client, an Unzipper file, and of course the script itself.
You need the SFTP client to access the server root and upload the script, and you need ht Unzipper file to unzip the script inside the server.
Download and install the SFTP client:
You can use Filezilla or WinSCP or any SFTP client to access your server root. For this tutorial, I’ll use Filezilla, so I’ll just download and install it.
Once you installed FileZilla, at the top enter the server or the application credentials. You will find all these credentials in your Cloudways Server Management.
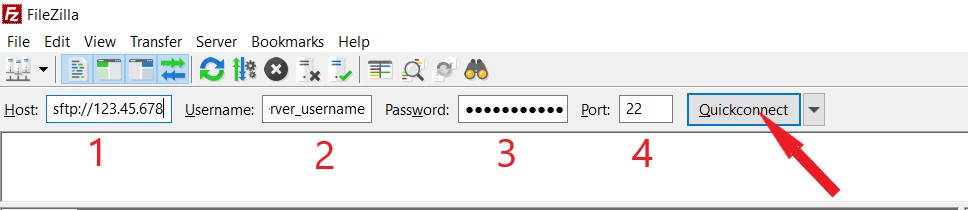
Access Cloudways server Via SFTP client:
In the Host field enter “sftp://yourIPaddress”, in the Username field enter the server username, in the Password field enter the server password, and in the Port enter “22”.
Finally, click Quickconnect.
This process should let you access your server on Cloudways.
If you choose to enter the server credentials, it will show up all the applications on that server, then you can click on the one you want to open it.
If you entered the application credentials, it will only open the application path, but you need to create the application credentials from the Cloudways application management. It’s easy to create them though.

Upload the PHP script:
To upload the PHP script go to the directory “/applications/yourappusername/public_html” if you access the Cloudways server via the server credentials.
And go to the directory “/yourappusername/public_html” if you access the Cloudways server via the application credentials.
Go to where the zipped PHP script is, drag and drop it inside the root folder and wait until it’s fully uploaded.
Step 7: Unzip the script:
Next, you need to unzip the PHP file you uploaded to the server. This can be done via SSH and SFTP. Since we already used an SFTP client to upload the PHP script, we will continue using it to extract the files
To extract the zipped files inside the root folder, you need to upload an unzipped file to the same root folder.
Download the Unzipper file below, extract it and upload the “unzipper.php” file the same way you upload the PHP script and to the same directory with the PHP script.
Next, go to “your-domain-nmae/unzipper.php” in your browser, you should see this screen below.
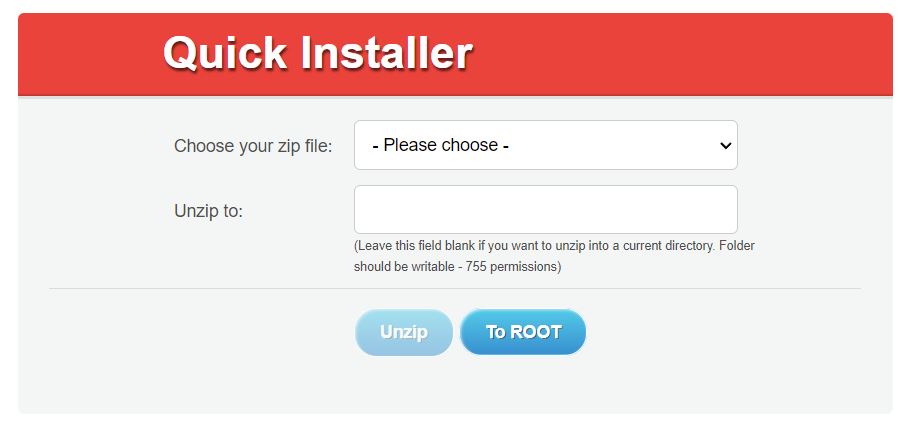
Next, choose your zip file and then click Unzip.
Now your PHP script is unzipped and you can delete the zipped file and the Unzipper file from your server.
Step 8: Install the PHP script
Installing PHP varies from one script to another, and they almost use the same method. Upload the files, meet the PHP minimum requirements, go to yourdomain.com/install, and follow the installation wizard.
But no worries, every script comes with its installation guide.
Host PHP script on Cloudways: The Conclusion
Installing PHP scripts from CodeCanyon (Envato Market) or any source is not a big deal on Cloudways. In fact, it’s very easy to achieve.
Cloudways makes it very easy to create and host applications such as Magento, WordPress, and Custom PHP with one click and helps you put all things together. Read Cloudways review.
Read also, how to create a WordPress website on Cloudways.