If your server on Cloudways is in need of more storage space, the Cloudways Block Storage is an excellent solution.
With the one-click Block Storage integration, you can seamlessly expand your Cloudways server’s storage space whenever it’s necessary or nearing capacity.
Things you should know before you create a block storage:
- Block Storage is available only on DigitalOcean servers and only in specific regions, which include: San Francisco, New York, London, Singapore, Amsterdam, Frankfurt, Toronto, and Bangalore.
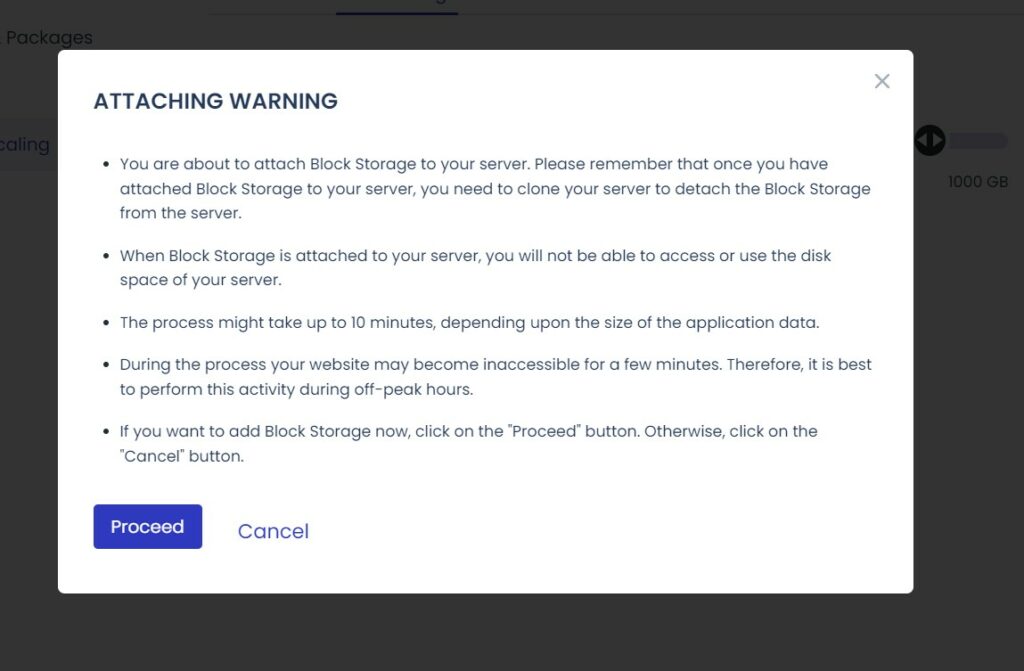
- After attaching block storage, all website data (files and database) shifts to it, making the previous disk inaccessible.
- Cloudways charges $0.1/GB/month for block storage. Thus, attaching a 200 GB volume to your server costs a $20 monthly fee, excluding server costs.
- The least you can attach is 10 GB and the maximum is 1000 GB per volume.
What is Cloudways Block Storage?
Block storage volumes are network-based block devices used to power the server with additional storage volumes. It allows you to add additional storage space to your server quickly and easily and functions like regular server block storage.
For every additional 1 GB volume, you will be charged $0.1 every month in addition to the server charges.
For instance, if your Cloudways server costs $11/month and attached 100 GB block storage, the total cost will be $21/month.
How to Attach Block Storage to Cloudways Server
Step 1: Navigate to the Targeted Server:
Login to your Cloudways account and go to the targeted server, the one to which you want to attach the block storage.
On the dashboard under Total Servers, click on View All Server, and then click on the server you want to open the Server Management panel.

Step 2: Open Block Storage Vertical Scaling
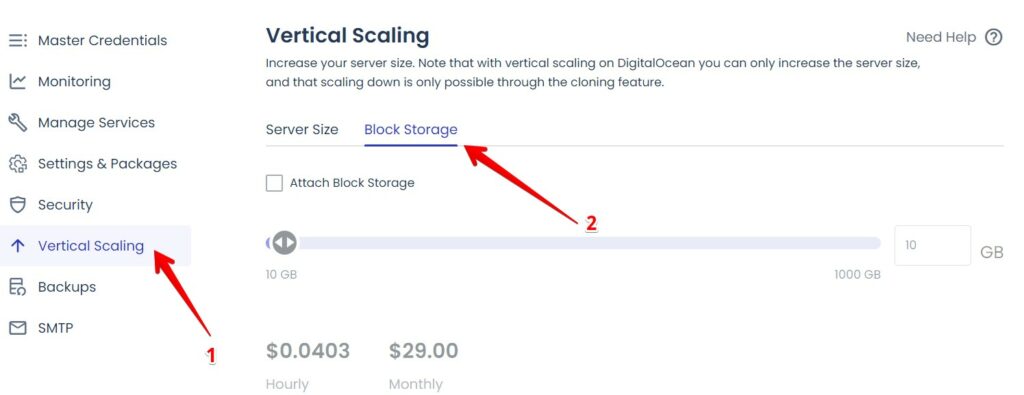
On the Server Management go down and click Vertical Scaling to open the vertical scaling window where you can increase the server and storage size.
There are two options for Vertical Scaling, Server Size and Block Storage. Click on the second option Block Storage.
Step 3: Add a Block Storage to Your Server
Once you are in the Block Storage tab, activate it by clicking on the Attach Block Storage checkbox.
Next, drag the slider right or left to specify the block storage you want, or type in numbers the amount of storage space in GiB in the little box at the end of the slider.
Notice that when you increase the Block Storage size, the amount of money you will be charged for the block storage will increase. This amount includes the price of both the Server and Block Storage.
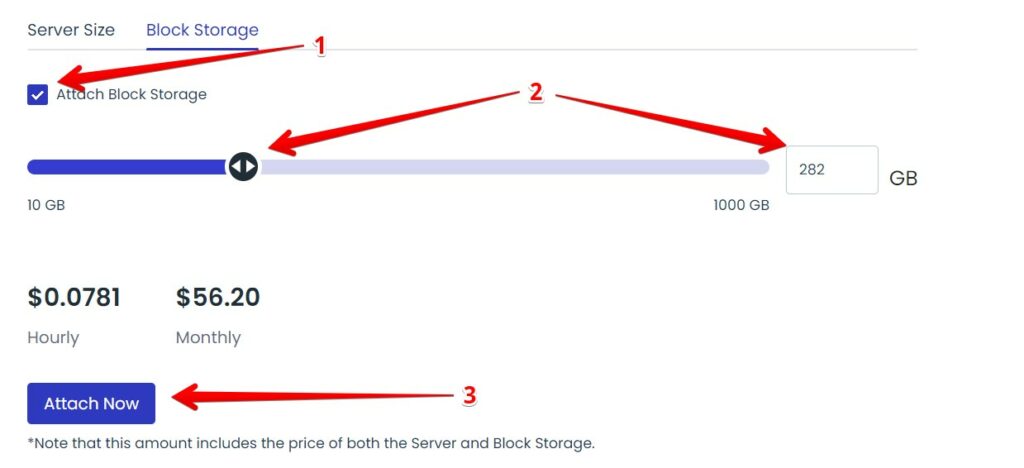
When you are done, click Attach Now. A warning window will pop-up, click Proceed to get it done. This may take up to 10 minutes.
Last Words
Cloudways Block Storage provides a simple and efficient method for augmenting storage capacity on your server.
By offering network-based block devices, it seamlessly integrates additional storage space, which operates just like the regular storage that comes with the server resources.
The cost structure is transparent, with users being charged a nominal amount of $0.1 for every 1 GB volume attached, making it easy to calculate and budget for.
Also, the ser-friendly interface makes Cloudways Block Storage an optimal choice for those seeking to increase their server storage space.
Read also:
What is Cloudways Autoscale?
How to Upgrade Cloudways Server PHP Version?
How to Point Domain and Install SSL Certificate on Cloudways?
How To Host Multiple Websites On One Server On Cloudways
Best Cloudways Features And Add-Ons
How to Setup Cloudways Rackspace Email Add-on


