Starting a blog becomes an easy thing to do for all, even if you are a newbie in this field. Thanks to no-code website builders such as WordPress.
In this comprehensive guide, you will learn:
- Choose your blog niche.
- Get a domain and web hosting.
- Install WordPress.
- Point domain to the blog.
- Setting up WordPress.
- Install and customize a theme.
- Install important plugins.
- Add legal pages.
- Write and publish your first blog post.
Read: How Much Does It Cost to Start a Blog?
Step 1: Choose Your Blog Niche
Choosing the right niche from the beginning is crucial; you don’t need to change your blog niche after you’ve spent time, effort, and money on it.
Choosing a niche in which you have experience or passion to pursue is the right thing to do. And if the two meet, even better, because maintaining a consistent writing schedule and pushing through failure to succeed.
But you should not ignore the possibility of profits from the niche of your choice if the purpose of the blog is to earn money. If your passion doesn’t generate money for you, it’s not worth it.
Tips to help you choose a blog niche:
Here are some tips to help you pick a niche for your blog:
- Pick a niche you enjoy writing about. Think about it five years later.
- If you have knowledge of the field, it will help you write faster and save time.
- Pick a smaller niche to rank faster and narrow the competition, but leave room for future expansion.
- Do marketing research and see if the niche has enough market. Use Google Trends.
- Make sure it’s profitable if it’s your main goal.
- Pick a niche that people love to read, not love to watch. Otherwise, you need to create a YouTube channel as well.
- Try to avoid seasonal niches.
- Evergreen niches are always better.
- Do some research.
Step 2: Get a Web Hosting and Register a Domain Name
To start a blog website, you need to sign up for a web hosting service to host your data on, and a domain name to let users easily access your blog through it.
- Domain name is a text pointing to a numeric IP address. It’s what people type into their browser to get to a specific website.
- Web hosting is an online service that allows you to publish your website or blog files onto the internet so people can access and visit your website through their internet browsers.
Since you are just starting out and you don’t have a huge traffic coming to your website, you can sign up for a shared hosting that is cost-effective and has free features, including a free domain name.
When your blog gets more traffic in the future, and you want more resources, you can easily upgrade to a better shared hosting plan with more resources, or move to a different type of hosting like VPS.
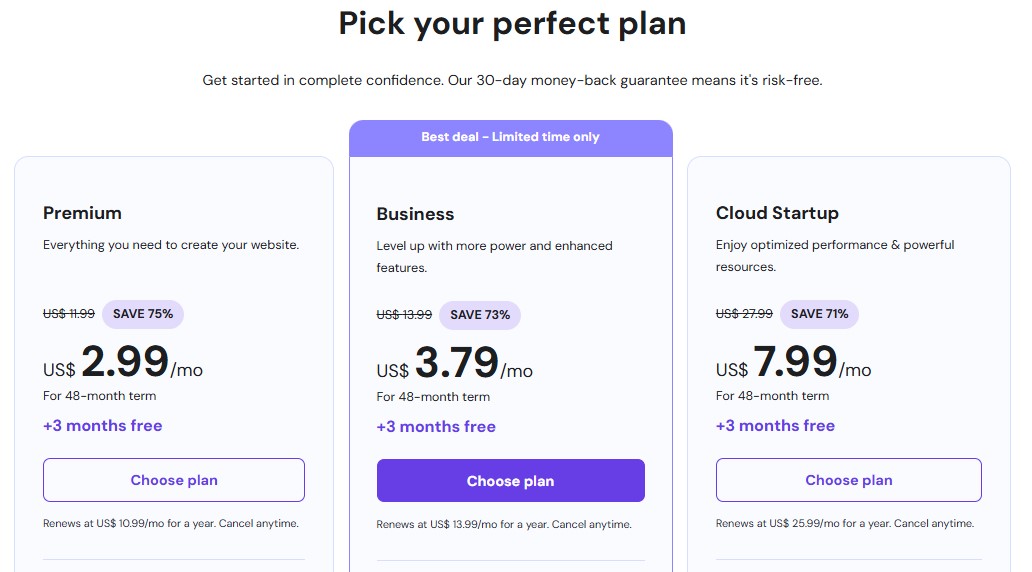
We will use Hostinger web hosting in this tutorial. It’s beginner-friendly, offers low prices, fast and reliable hosting services, and a lot of great free features.
Go to Hostinger and then scroll down to see the shared hosting plans. See each one and pick the best fit for your needs in terms of the monthly traffic, storage space, and so on.
Let’s talk about the types of web hosting and how to choose a domain briefly to get a general understanding of what they mean.
Read: How to choose the right web host
Types of web hosting
1. Shared hosting:
Starting at $3 per month, shared hosting hosts multiple websites on one server. The resources of that server, such as disk space, CPU, and memory, are shared between the websites on the server, and costs are split between all the users on that server.
Shared hosting is the best choice for beginners who are on a budget, and for small and new blogs, portfolios, and small to medium businesses. It offers free features such as domain, SSL certificate, email, and support.
2. Virtual private server (VPS:
This type provides a dedicated server for you with dedicated resources. Think about it, a computer is a server, and the partitions on that computer are VPSs.
VPS is a faster, more reliable, more secure, and more stable solution, and you have complete control over the server. But, it costs more money, needs knowledge and server maintenance, and comes with no features like shared hosting
VPS hosting is a great choice to start with if you have a blog with a ton of traffic and want to start big, to get better performance, or for eCommerce websites.
3. Dedicated Servers:
A dedicated server is a type of remote server that is entirely dedicated to you. It offers immense power and flexibility as you get an entire server machine dedicated to you.
Dedicated servers require more technical experience than the VPS, cause you will have to do everything by yourself. They are meant for the large sites like eCommerce sites that get millions of visitors every month.
| Comparison | Shared Hosting | VPS | Dedicated Servers |
|---|---|---|---|
| Price | Low Price $3/mo | Reasonable $5-$50/mo | Expensive $80/mo and more. |
| Allocated resources | Shared resources on a shared server | Dedicated resources on a shared servers | Dedicated resources and server |
| knowledge Required | Beginners | Need technical knowledge | Need technical knowledge |
| Best for | Blogs and small websites | Business websites | Large eCommerce websites |
| Traffic Best for | Low and medium traffic websites | medium and high traffic websites | Huge traffic websites |
| Performance | Good Performance | Great Performance | Excellent Performance |
| Best Provider | Hostinger | Cloudways | Vultr |
Once you decide which web hosting service fits you best, now it’s time to sign up for it. Go to the web hosting provider and sign up for the plan that you need.
Tips to Choose the Right Domain Name:
It’s essential to choose a domain that both represents your brand and makes it easy for people to remember and find your blog. For instance, (HostingEngines.com) is our domain name, and it represents our website goal.
You can choose to name your blog domain by your own name (yourname.com) or you can pick a domain name that represents your brand specifically.
If you don’t have an idea of which domain you should choose, you can use a domain name generator tool to help you out.
These are several tips that will help you choose the right domain name for your niche. Try to implement as many of them as you can.
- Keep It Short: The longer the domain names, the harder to remember and type.
- Make it easy to remember: If a customer reads your domain name and finds it easy to remember, he’s more likely to come back.
- Make it easy to pronounce: The domain name that is easy to pronounce is easier for visitors to share.
- Make it easy to type: You don’t want visitors and potential users to mistype your domain name when they decide to visit your blog again.
- Search for a unique domain: When any visitor visits your site, the domain name of your site sticks in their minds if it’s unique. such as Google, Yahoo, Facebook, and Bing.
- Avoid double letters, hyphens, and numbers: They make it harder to pronounce and spell. Besides, they may make visitors feel that this is a spammy website.
- Consider using a keyword: Using a keyword in your domain name that describes the services you provide on your website will play a role in SEO.
- Leave room for future expansion: Don’t confine your site to a narrow angle. Yes, you need to narrow down your niche, but you also don’t want to limit it too much.
Step 3: Install WordPress and Create the Website
You have owned a domain and signed up for web hosting. Now it’s time to work on creating your blog, starting with installing WordPress.
WordPress is a content management system (CMS) that allows you to host and build blogs with full control. It contains plugin architecture and a template system, so you can customize your blog to fit your business.
The process of installing WordPress is simple and similar on most web hosting providers using the 1-click WordPress install feature.
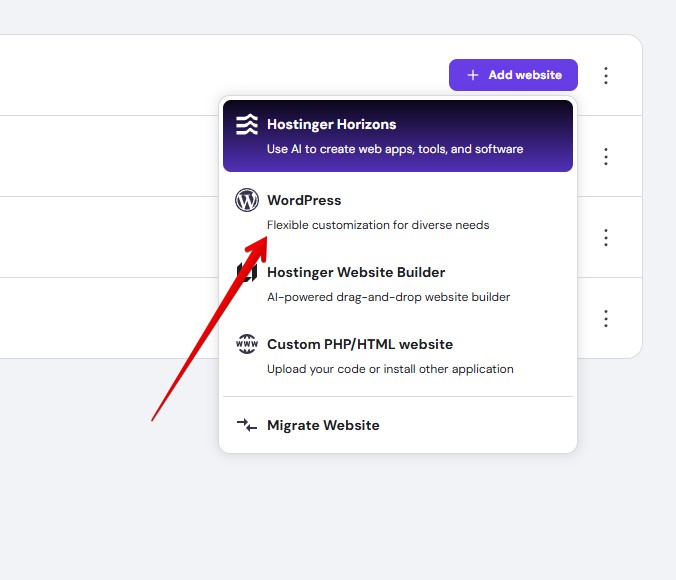
After you purchase the hosting plan on Hostinger, log in to your account, then go to Websites ->Websites List -> and then click on Add website.
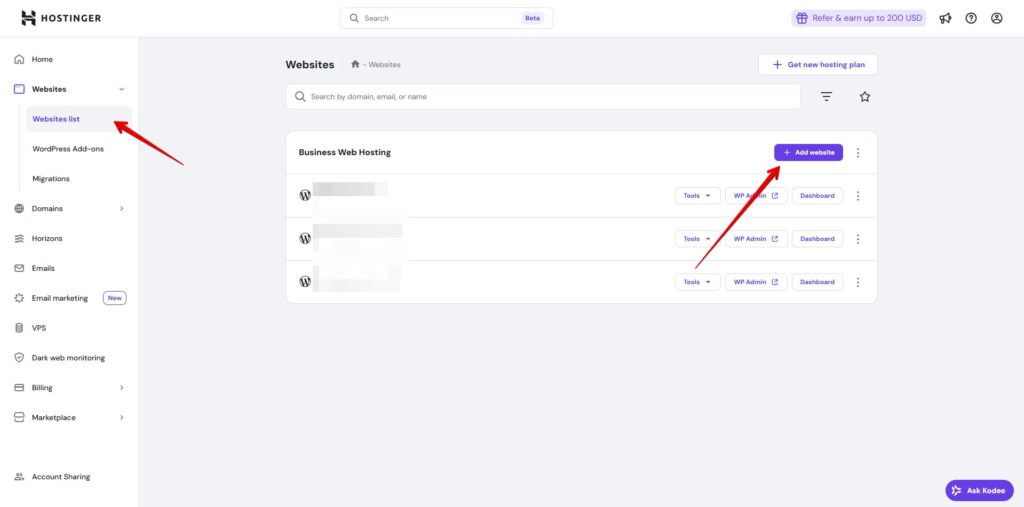
Then choose WordPress from the drop-down menu and follow the simple steps after, such as login details, website theme, and plugins, and domain name.
You can choose any website theme from the free theme list and change it later, same as plugins.
Also, you can add a domain in this step, or continue without a domain name and connect a domain later.
Finally, click Install WordPress, and wait for the full installation to complete.
Once the installation is finished, Hostinger will show you your new website immediately. And you can always navigate to your website settings for the Websites List in the hostinger dashboard.
Read: Hostinger review
Step 4: Setting up WordPress
Point Your Domain To Your Blog
If you register a domain name with the hosting package that comes with one free domain, you can skip this step, as it’s already set up by default when you chose the domain.
But if you signed up for a hosting provider that doesn’t offer domain registration, or you want to use a different domain name that is registered on another platform, you need to point your domain name to your new WordPress blog.
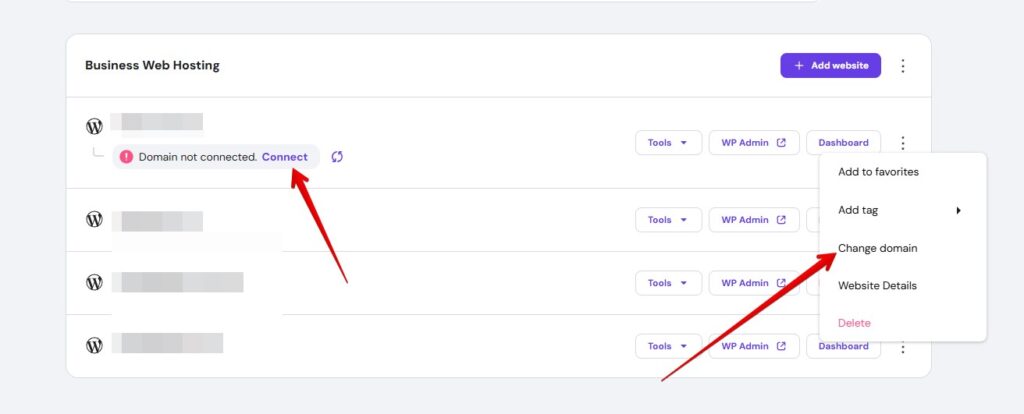
Go to Hostinger Websites List, and click Coinnect, to see the steps you need to follow to connect a domain you added while installing WordPress. Or Change domain to a different one.
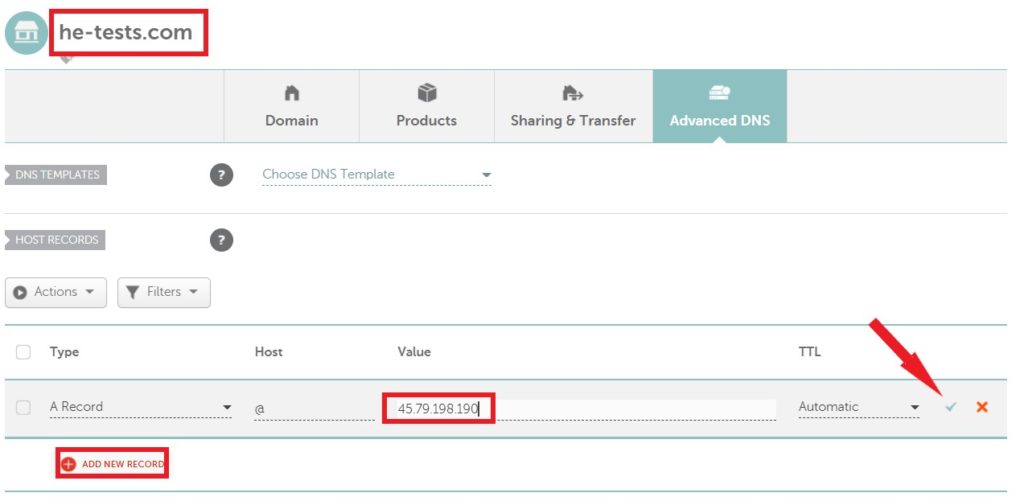
Go to the platform where you have the domain name, and either change the name servers to Hostinger’s, or if you want to keep your DNS zone at your current domain provider, connect the domain using the A record method instead.
General Settings:
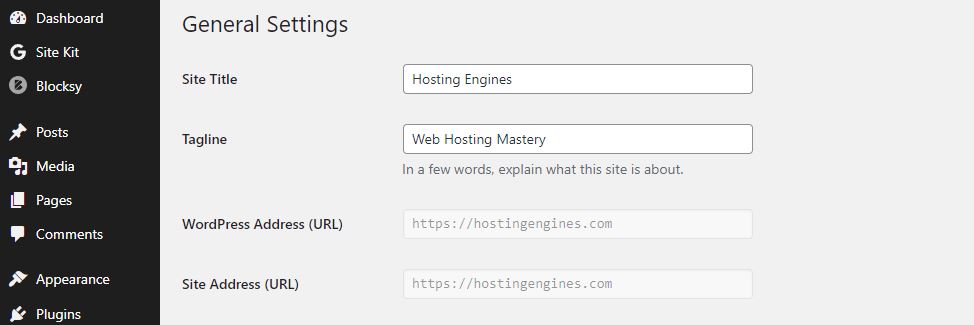
You can go to your WordPress website admin dashboard by either clicking on WP Admin in the hostinger control panel or going to (yourwebsite.com/wp-admin)and entering login credentials.
Make sure to add your blog title and the tagline. Also, make sure that you add your WordPress Address and Site Address correctly as shown below. You can find this in Settings -> General.
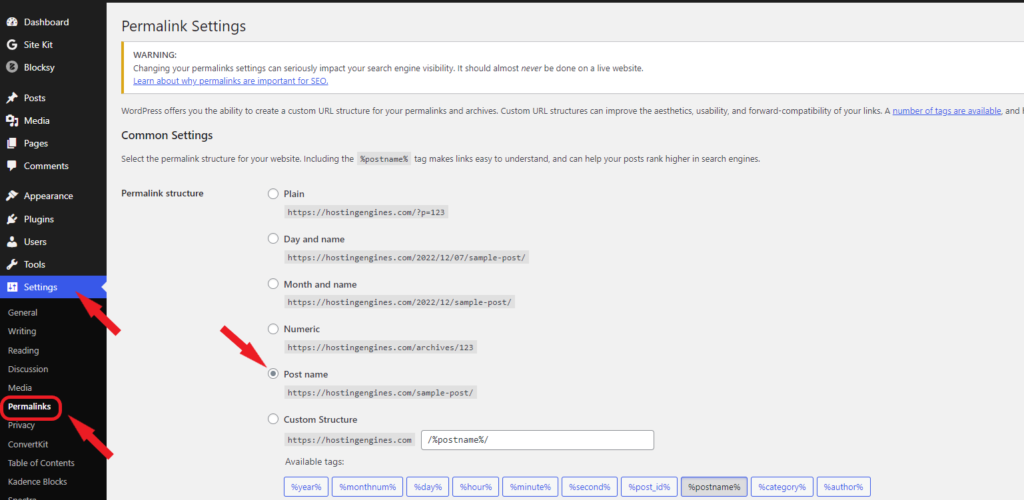
The permalinks are the links of the pages and blogs that come after the domain name. For example, this page link is (https://hostingengines.com/start-a-blog/), and the permalink of it is (/start-a-blog/).
You don’t need your web page’s permalinks to look like (/2022/12/07/sample-post/) or like (/?p=123). They are not user and SEO friendly. You can find this in Settings -> Permalink.
Go through all WordPress settings to know more about the controls that you have and that you can modify with your blog.
Step 5: Install and Customize a Theme
After you do all of the above, now it’s time to apply a theme for your blog to change its appearance and become more professional and appealing.
Themes are a set of graphics and code files used to change the look of the website entirely and customize it the way you want.
The themes are made of codes and stylesheets, they will impact the website speed. There for, you need to choose a theme with less impact on loading time and has many features.
Here are the themes that we found to be the best:
- Blocksy: fast, reliable, and has lots of free features, the one we are using.
- Neve: fast and reliable.
- Kadence: fast with lots of ready-made templates and forms.
1. Install a theme:
To install a theme, scroll down and hover over Appearance in the left panel of the dashboard and click Themes, then click Add New.
Next, type in the theme name you want to install in the Search Theme, click on Install, then click on Activate to activate the theme.
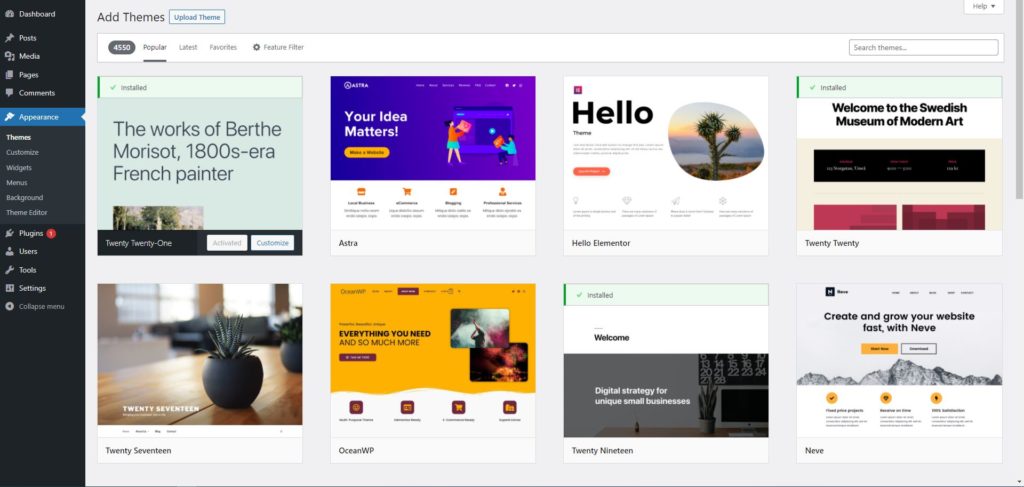
There are an enormous number of themes on WordPress you can choose from and use for free forever, and they are more than enough. But if you want more features and capabilities, you may want to purchase a premium license.
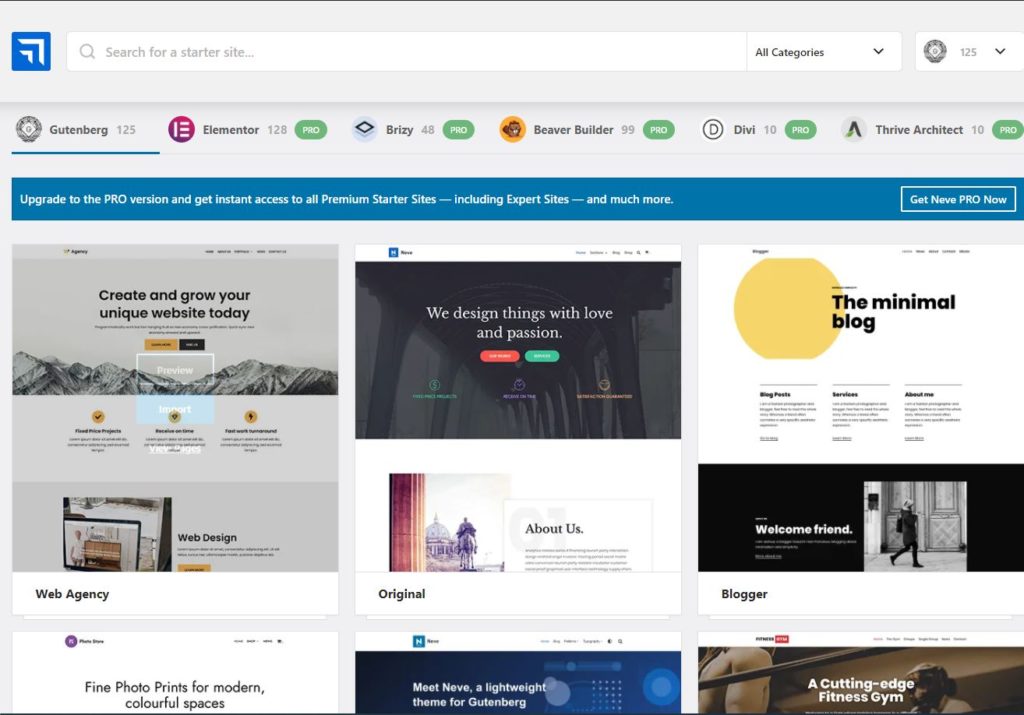
2. Use a starter template:
After you install and activate the theme, you can shorten the time and effort you will spend on designing your blog by using a ready-made starter site.
If you installed the Neve theme, for instance, on the Appearance section, click Neve Options, then click Go To Starter Sites.
Next, install and activate the starter site plugin, and then you can choose from a bunch of ready-made starter templates to use on your blog and modify later.
Hover over a starter site you choose, click import, import the entire site, wait for a few seconds, and go to your blog frontend to see the differences.
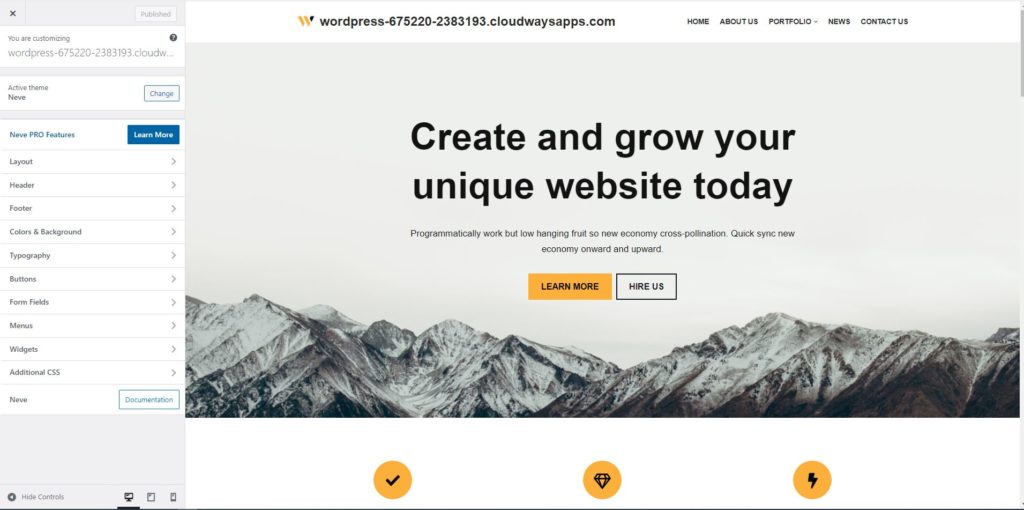
3. Customize the theme:
To modify and customize the theme, click on ‘Customize’ in the top admin toolbar of your WordPress blog’s front end.
On the left side, you will see a bunch of settings that will help you edit and customize your blog appearances such as layout, header, footer, menus, widgets, sidebar, colors, fonts, blog posts, pages, logos, and more.
Step 6: Install Important Plugins
In addition to the themes, you can add some plugins to help your blog perform better, and others will help you in other areas.
WordPress plugins are a set of code snippets that are used on WordPress to do things on a website or a blog without coding, which can’t be done with coding.
For example, connecting your blog, Google Search Console, and Google Analytics from your WordPress blog is easier by using Google Site Kit.
When you want to install a plugin, on the admin dashboard, hover over Plugins and then click on Add New.
On Search Plugins, type in the plugin name that you want to install on your blog. When you find it, click on Install Now, then click Activate.
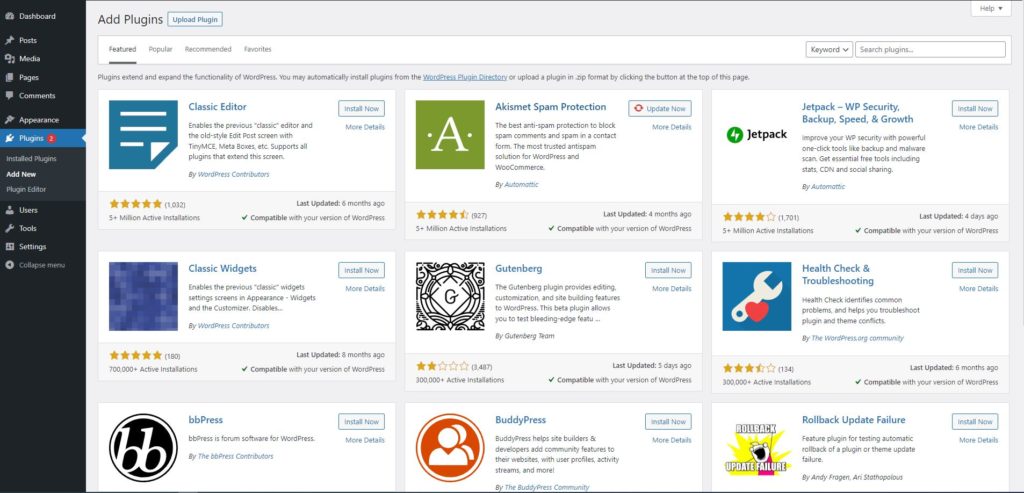
Here are some important plugins you may wamt to install on your blog:
- Site Kit by Google: yo use everything Google has to offer for WordPress users.
- Yoast SEO/Rank Math: an all-in-one SEO solution for WordPress.
- Akismet Spam Protection: anti-spam protection.
- LiteSpeed Cache: page caching and site optimization.
- Easy Table of Contents: an automatic way to create and display a table of contents.
Step 7: Add Legal Pages
There are legal pages you must include on your blog to avoid any kind of penalty or lawsuit, such as the Privacy Policy to protect your clients and Terms and Conditions (T&C) agreements to protect you. They are, as the names imply, legally binding contracts.
The two important legal pages of any simple blog are Privacy Policy and Terms and Conditions.
Yet, depending on the services you provide on your blog, you should add certain legal pages such as Disclaimers, Cookies Policy, Refund Policy, General Data Protection Regulation (GDPR), etc.
You can use AI to help you create professional legal pages by inserting some information about you, your business, and what your blog offers.
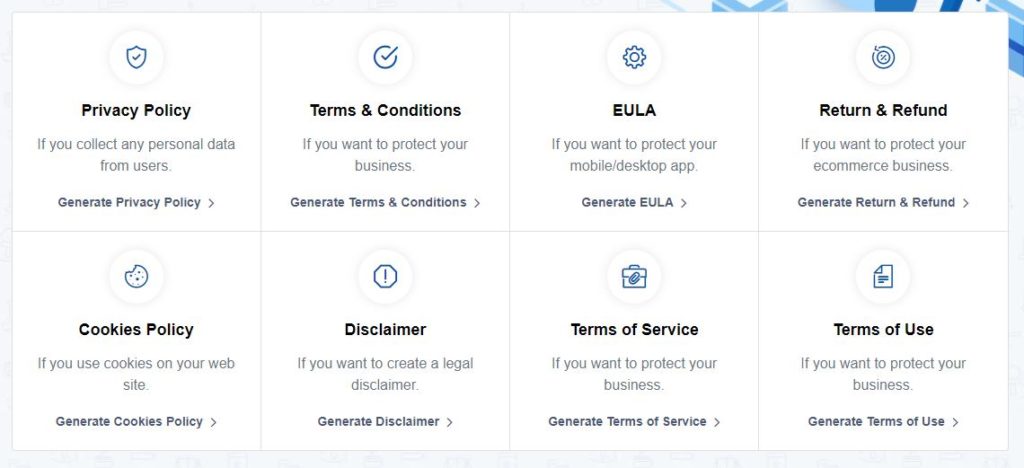
To add the content generated to your new website, head to your WordPress admin, hover over pages, click add new, and copy and paste your generated content.
Step 8: Write and Publish Your First Post
Creating a blog post in your WordPress blog is as simple as creating a Facebook post but on a much larger scale.
To create a blog post, hover over Posts in the admin dashboard and click Add New. You will see the text editor where you can add your text and upload your images.
Here are the things that you need to do in order to create a blog post:
- Add a catchy title.
- Add the blog text.
- Upload images.
- Refine and shorten the blog post URL.
- Add the post category.
- Add a featured image for your blog.
- Hit Publish.
The Conclusion
Thanks to no-code website builders, starting a blog post without knowing how to code is so easy now. Within 10 minutes, you will be able to create, set up, and publish a blog website on the internet.
There are many no-code website builders such as WIX, Blogger, and Squarespace, but WordPress seems to be the best overall due to many factors.
Choose the right niche, domain name, and web hosting service from the beginning so you won’t change them later, to avoid wasting your time, effort, and money.