On July 1, 2022, DigitalOcean changed its pricing structure. They increased the expenses of their servers a little and introduced a new cloud VPS droplet that costs $4 per month.
This server provides nearly half the resources of the 1GB VPS regular plan.
Today we will put it to the test and see if it’s enough to run your business and maintain a good performance.
About the DigitalOcean $4 Plan:
DigitalOcean is one of the best leading cloud hosting companies in the entire world with a reputation that surpasses it.
It has been the server power for a lot of companies and developers, and even beginners and for a long time. Read DigitalOcean review.
After the recent price changes in its servers, DigitalOcean introduced a new droplet plan that costs $4 a month with all the resources and server needs.
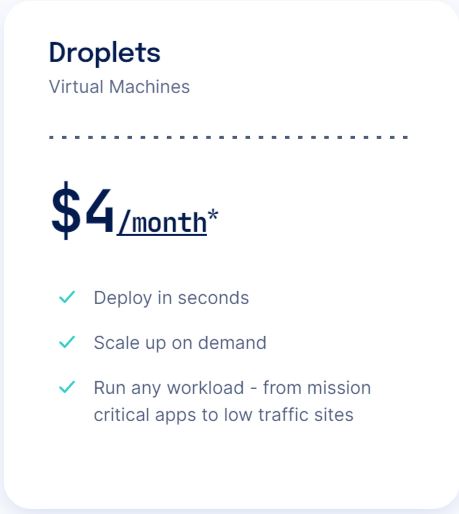
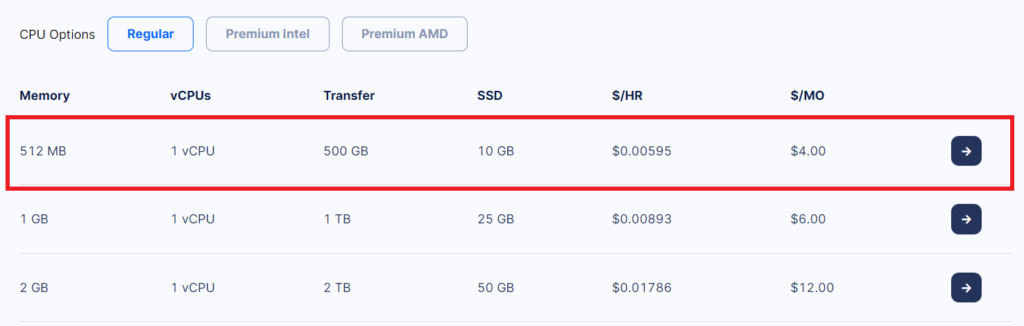
The $4 server plan comes with 512 MB RAM, 1 vCPU processor, 500 GB Transfer bandwidth, and 10 GB SSD storage space.
This plan is only available in the Regular CPU Option in New Your, Frankfurt, and Sydney datacenters.
Also, you don’t have the option to install Apps from DigitalOcean’s marketplace automatically.
We can tell from the surface that this server size is quite enough for new to small websites. But let’s not fully judge before testing it.
Pros and Cons of DigitalOcean $4 Plan:
The Pros:
- Low price: With this droplet, you get an entire VPS server with all the resources you need to launch your web application at a low price.
- SSD storage: This plan offers SSD storage space which will make the app you host fast.
- Generous Bandwidth: You get a 500GB transfer, which is more than what you want for your small website.
The Cons:
- Not available on all data centers: The $4 plan is only available in New Your, Frankfurt, and Sydney server locations.
- No automated WordPress installation: This plan doesn’t offer 1-click WordPress installation or any type of app. You would need to do this manually.
How to Install DigitalOcean $4 Droplet?
Installing a server with the $4/month plan is pretty much the same process you would take to install any other VPS server.
You can read this article to do that in detail, but to sum it up, here’s how you can install a server on the DigitalPcean $4 plan.
For that, you would go to digitalocean.com and sign up or login to your account. If it’s your first time with DigitalOcean, our link gives you $200 free credit with them.
Go to Droplets, and then click Create Droplet.
After that, choose your server operating system such as Ubuntu or Debian.
Next, from the Shared CPU plans choose the Regular with SSD option and then select the $4/mo plan.
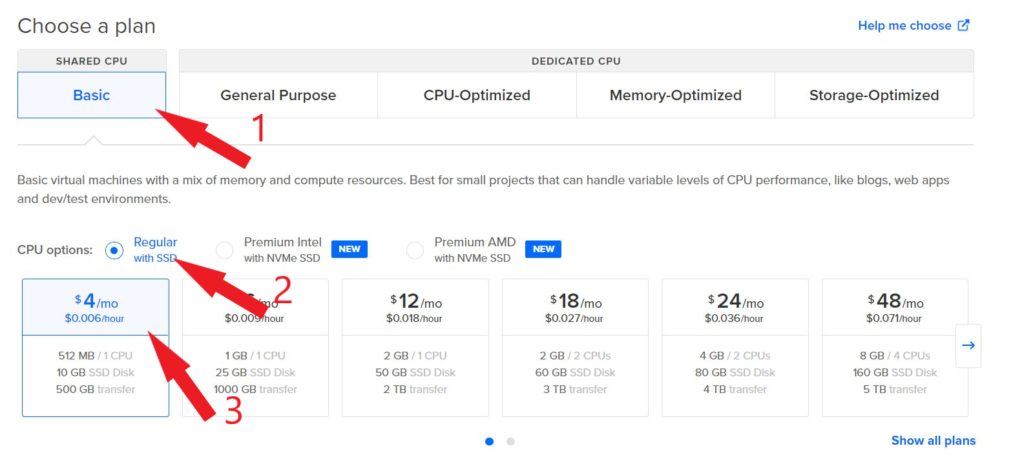
Once you do that you can then proceed to the next step of launching your server which is choosing the server data center.
You have to choose one of the data centers that the $4 plan is available on. Right now, they are New Your, Frankfurt, and Sydney data centers.
Add the server root passwords, backups, and so on. To know how to do that in detail you can read this article.
Can You Install WordPress on the DigitalOcean $4 Server?
Unfortunately, you can not install the 1-click WordPress install from the DigitalOcean marketplace.
When you try to do that, it tells you that “This size doesn’t have enough disk space to support the image you selected”.
Alternatively, you can perform a manual setup for WordPress, You can use the Ubuntu image and do configure the server.
You can do that easily by following this guide. But if you want a brief and fast guide you follow the commands below.
How to Install WordPress on the DigitalOcean $4 Plan?
There are many ways to set up WordPress manually. In this example, we will use Ubuntu on top of the server. Follow these steps in order.
- First: Access the server:
Access the server via SSH terminal such as Putty and via SFTP client such as Filezilla. We will need them both.
To access the server using these programs you only need the IP address, the username “root” by default, and the root password that you created while creating the server.
- Second: Install PHP and Apache:
On your SSH window, after you log in to your server, enter the command below and click enter to install PHP and Apache.
sudo apt update
sudo apt install apache2 \
                 ghostscript \
                 libapache2-mod-php \
                 mysql-server \
                 php \
                 php-bcmath \
                 php-curl \
                 php-imagick \
                 php-intl \
                 php-json \
                 php-mbstring \
                 php-mysql \
                 php-xml \
php-zip- Third: Install WordPress:
After the above command finishes installing, enter the below command and click enter to create the WordPress installation directory and download the WordPress files from WordPress.org.
sudo mkdir -p /srv/www
sudo chown www-data: /srv/www
curl https://wordpress.org/latest.tar.gz | sudo -u www-data tar zx -C /srv/www- Fourth: Create a conf file:
This time we will use the SFTP client. After you login to your server go to the directory “/etc/apache2/sites-available/” to create the config file for WordPress.
Go to the directory and create a new file. Open the new file and copy the lines below and then save it.
<VirtualHost *:80>
    DocumentRoot /srv/www/wordpress
    <Directory /srv/www/wordpress>
        Options FollowSymLinks
        AllowOverride Limit Options FileInfo
        DirectoryIndex index.php
        Require all granted
    </Directory>
    <Directory /srv/www/wordpress/wp-content>
        Options FollowSymLinks
        Require all granted
    </Directory>
</VirtualHost>- Fifth: Configure Apache:
Go back to the SSH terminal and enter the following command each at a time
sudo a2ensite wordpress
sudo a2enmod rewrite
sudo a2dissite 000-default
sudo service apache2 reload
- Sixth: Create WordPress Database and Username:
Now WordPress has been installed successfully. And if you go to your server IP or domain name, you will see that WordPress is installed and ready to be configured before using it.
But in order to configure it, you need to create a database and a username. To do so go to the MySQL directory following the command below
sudo mysql -u rootAnd then you can create your database, username, and password
mysql> CREATE DATABASE wordpress;
mysql> CREATE USER wordpress@localhost IDENTIFIED BY '<your-password>';
mysql> GRANT SELECT,INSERT,UPDATE,DELETE,CREATE,DROP,ALTER
mysql> FLUSH PRIVILEGES;
mysql> quit
- Seventh: Configure WordPress:
Go to your website via your IP address or your domain name if you pointed to your IP address. Choose the language of your WordPress website and click Continue.
Enter the info that you created earlier, your Database name, your Username, your Password, and localhost for your Database host.
Once you do that, click Submit, and now your WordPress website is configured and ready.
DigitalOcean $4/mo Server: Is It Enough?
After testing this plan, we found that it’s as good as the 1GB RAM plan. It contains all resources you need in order to deploy a server.
Also, we installed WordPress manually on it, the WordPress website runs smoothly with no any issue.
In the end, the server is a good start if you are on a budget and you can do manual installation. And you can scale up later on.
Otherwise, DigitalOcean has many affordable Cloud VPS plans that have all the required stuff such as the $6 and $7 plans.
Read also:
DigitalOcean vs Vultr vs Linode.
Vultr $2.50 Plans Vs. $3.50 Plan Vs. DigitalOcean $4 Plan Comparison.